When I began float tubing, like most people I started with the bare minimum…A float tube, a pair of waders, fins, a PFD, and a single fishing rod. I used the provided Velcro lashing straps sewn into the float tube’s canvas shell to hold my rod when it wasn’t in use, held my fishing rod in my hands when it was in use, and fumbled with the stupid thing when I actually succeeded in catching a fish! Watching me from the shoreline HAD to have provided some laughs for any nearby anglers. But who cares?! I was having a blast and was slamming more fish than any of the chuckleheads on the shoreline! Truth be told, we don’t come out of the womb knowing how to float tube. There is no “Float Tubing Chromosome” that some are blessed to have. It takes time. And for most float tubers, a lot of that time, both in and out of the water, is spent thinking, “How can I make this whole float tubing gig more comfortable?”
From the minute I made my first kick away from the shoreline in a float tube, I realized that some “tinkering” could result in a dramatically more comfortable fishing experience. Subsequently, I have spent countless hours in the garage and far too much money at the hardware store to come up with a system that works for me. And what I’m hoping to do here is share a bit of what I’ve done to make my float tube setup as comfortable, convenient, economical, and portable as possible in a format that should make this a snap for you to put together too!!
What many may not realize is how easy it is to get their float tubes completely dialed in. PVC piping is a wonder material for rigging your float tube that is inexpensive and incredibly easy to work with. With only a few very basic hand tools and a little bit of time, you can create a long-lasting fishing apparatus that will make your time on the water so much more enjoyable and that you’ll be proud to show your buddies! And putting this wonder material to good use is exactly what I hope to show you how to do herein…
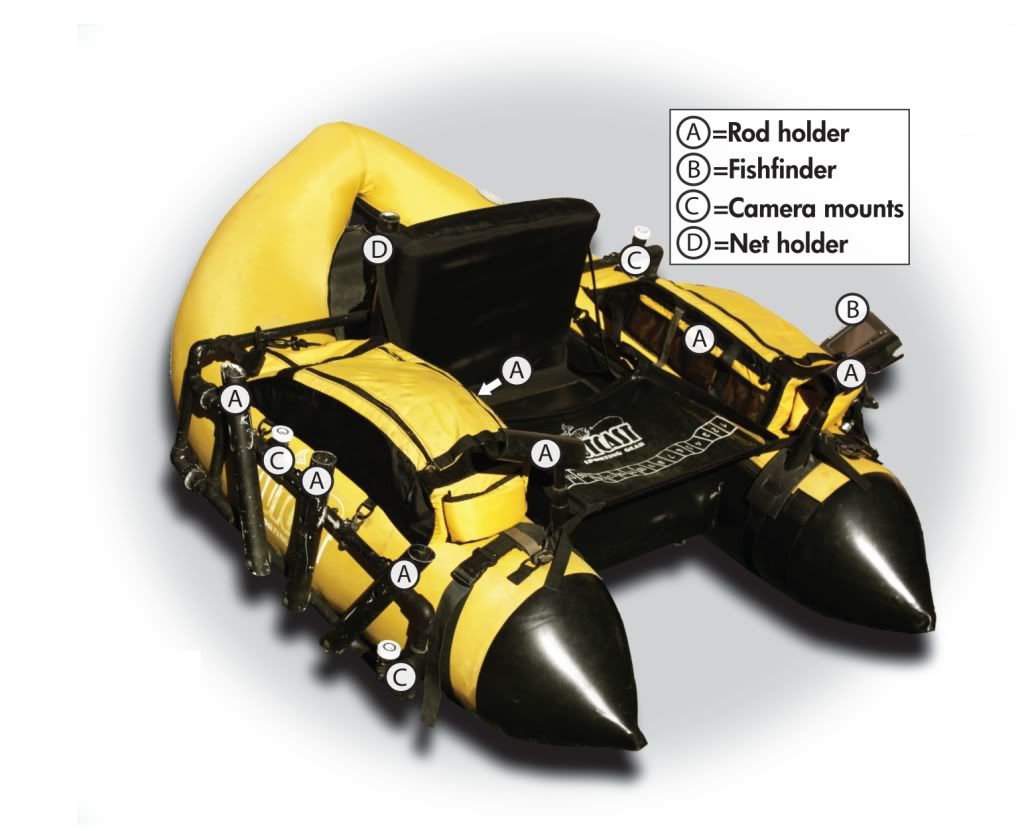
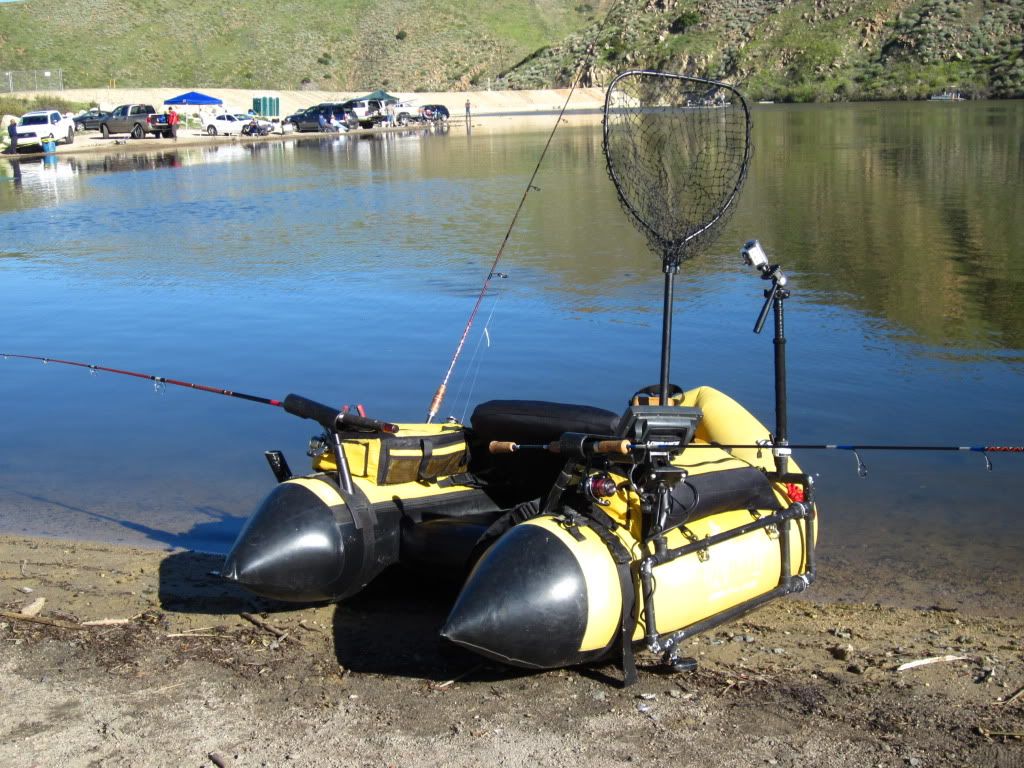
Below you will find step by step instructions for building much of the rig pictured above. This setup is completely modular and can be dialed in and modified to exactly how YOU want it! It also collapses so that it can fit IN ITS ENTIERETY into your float tube bag! Tinkering requires a personal touch and you are strongly encouraged to modify anything and/or everything to fit your needs!! In NO way, shape or form is this the most simplistic, cheapest or ONLY mode of accomplishing the goal of holding your gear…but it is my way! I’ve been using this same rig for about 6 years now (with a little modifying here and there) and LOVE IT. Everything is just how I like it and it has not failed me yet!
My friend Steve was nice enough to loan me his Outcast Fish Cat 4 Deluxe for this project so all sizes and dimensions provided will be as per the specs of this particular boat. I also have my setup rigged for my Super Fat Cat and will provide the specs for that boat as well. So the sizes and dimensions listed herein will work for the Fish Cat 4-LCS, Fish Cat 4 Deluxe, Fat Cat, and Super Fat Cat. I have a Prowler on its way and will be able to provide those specs in the coming days to complete the Outcast lineup (other than the Trinity). And what else is great about this system, is that if you have multiple different boats (e.g. a Fish Cat 4 Deluxe and a Super Fat Cat), you can easily transfer this system among your fleet! No doubt some variation of this rig should work on other boats such as the ODC 420 and Caddis boats, however, I have been an Outcast guy for a long time so have no idea what would be required to do so! But be sure to let us know if you come up with something!!
All of the materials (piping, hardware, adhesives, tape, etc.) required for this project can be purchased for about $50-$60 from your local hardware store and the entire project can be assembled in an afternoon. Remember, we are not building a piano! No need to agonize over 1/64 of an inch or a slightly rough cut!!! I THOROUGHLY RECOMMEND READING THIS ENTIRE SET OF INSTRUCTIONS PRIOR TO BEGINNING YOUR BUILD FOR OBVIOUS REASONS! And most importantly, be sure to have fun, take your time, and enjoy reaping the benefits of having a convenient setup that stores well and keeps all of your gear at your fingertips! HERE WE GO!!!
REQUIRED TOOLS
The list of tools required to complete this project is short and are probably tools you already have on hand. If you do not have a particular tool, use that ingenuity of yours to figure out a way around it! Or use your wallet to go out and buy the tool!!
Tools
Tape Measurer
Pencil
Marker
PVC cutters
Drill
5/16″ Drill Bit
5/8” Drill Bit (can substitute with a 1″ step bit)
Hammer
Pliers and/or a crescent wrench
Miter Saw (optional)
Vise (optional)
SHOPPING LIST
As stated previously, all of these bits and pieces were purchased from Lowe’s. But these are common items and I’m sure that most hardware stores will have them.
PVC AISLE
(2) 8’ Schedule 40 1/2” PVC piping (this includes a little extra “just in case”)
(1) 5’ Schedule 40 1 1/2” PVC piping
(1) SHORTEST PIECE YOU CAN BUY 1” PVC piping (will only need a couple of inches of material)
(8) 1/2” T connectors (slip-slip)
(8) 1/2″ Elbows (slip-slip)
(1) 1 1/2” to 1” Reducing T connector (slip-slip)
(2) 1″ to 1/2″ reducing elbows (slip-slip)
(1) 1″ T connector
(1) 1 1/2” end cap
(7) 1/2” Screw together couplings (slip-slip)
(1) Small bottle of PVC Primer
(1) Small bottle of PVC cement
HARDWARE AISLE
***You can use galvanized, zinc coated, stainless steel, etc. hardware. Stainless Steel is probably the best option but is also the most expensive. But if you plan on taking your rig into the saltwater, I would definitely recommend stainless steel! If you are a freshwater only float tuber, the cheapest hardware option should work fine***
(3) 1/4” x 3” Carriage bolts
(3) 1/4” x 1 1/4” Carriage bolts
(4) 1/4″ x 1 1/4″ eyelets
(4) 1/2” Trigger Snaps (clips)
(10) 1/4″ Acorn Nuts
*no washers required*
Miscellaneous (optional)
(1) Electrical tape
(1) Thread Locker (e.g. Loctite)
PREP
So you’ve gathered all of your materials and are now ready to start the prep work! Below is a comprehensive list of all of the bits and pieces that you will need to cut and prime in preparation for this project. Doing this up front will make following the assembly instructions easier and will also make the entire build much quicker!
1/2” PVC pipe
4 @ 21 1/2”
6 @ 5 1/2”
16 @ 1 1/4”
3 @ 1 3/8
2 @ 18” ***FOR SUPER FAT CAT OWNERS, MAKE THESE PIECES 18 3/4”***
1” PVC pipe
3 @ 1 1/2”
1 1/2” PVC pipe
1 @ 2”
1 @ 3” ***FOR SUPER FAT CAT OWNERS, MAKE THIS PIECE 4”***
1 @ 12”
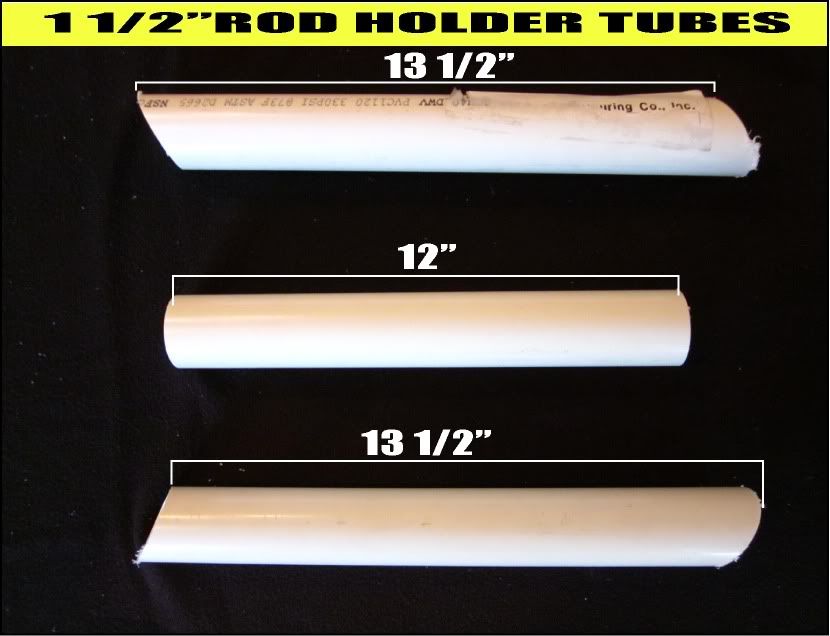
45 degree miter pieces…
2 @ 13 1/2 FROM LONG POINT TO SHORT POINT! To clarify what that means, refer to the image below…
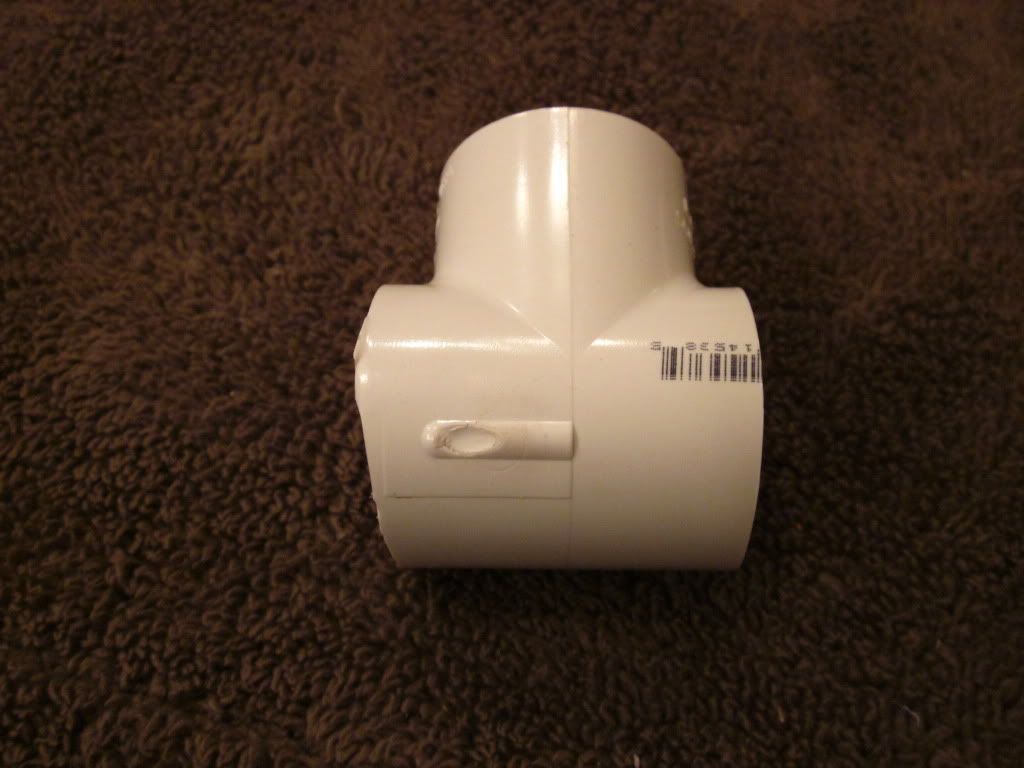
1” T
Cut the 2 legs at the top of the “T” so that they protrude only about 1/4” from the central portion of the “T”. For clarification, refer to the image below…
After you have made all of your cuts, a compilation of all of your PVC materials and hardware should look like these images…
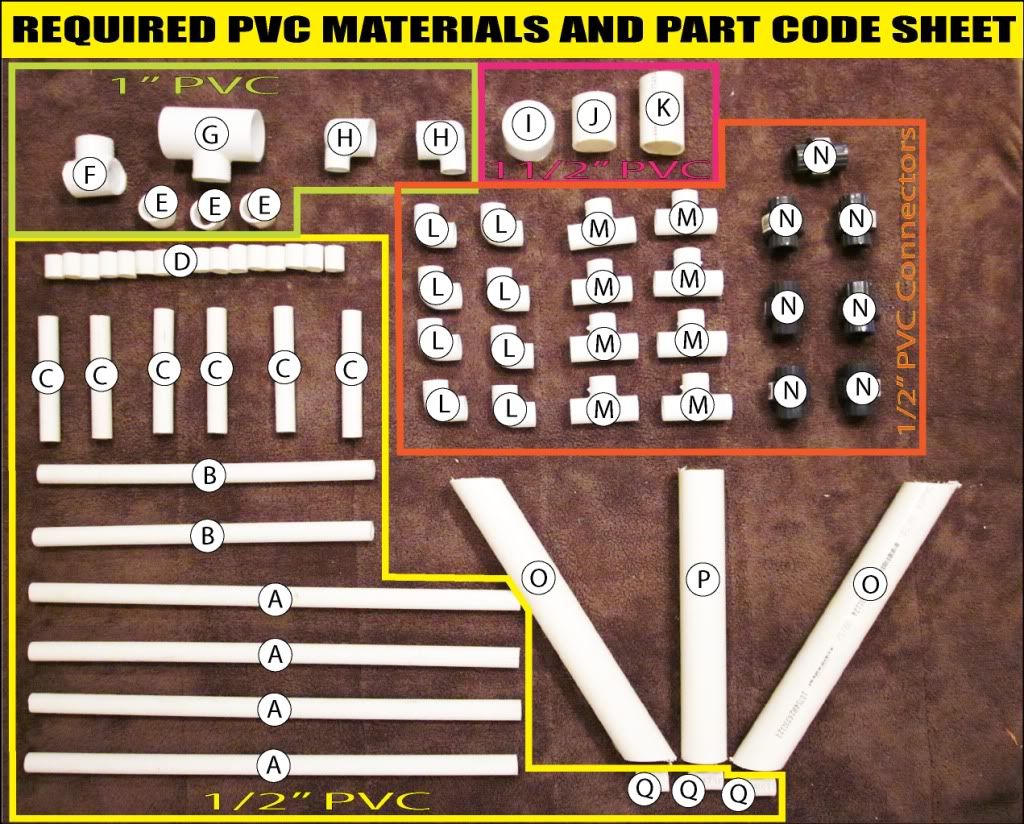
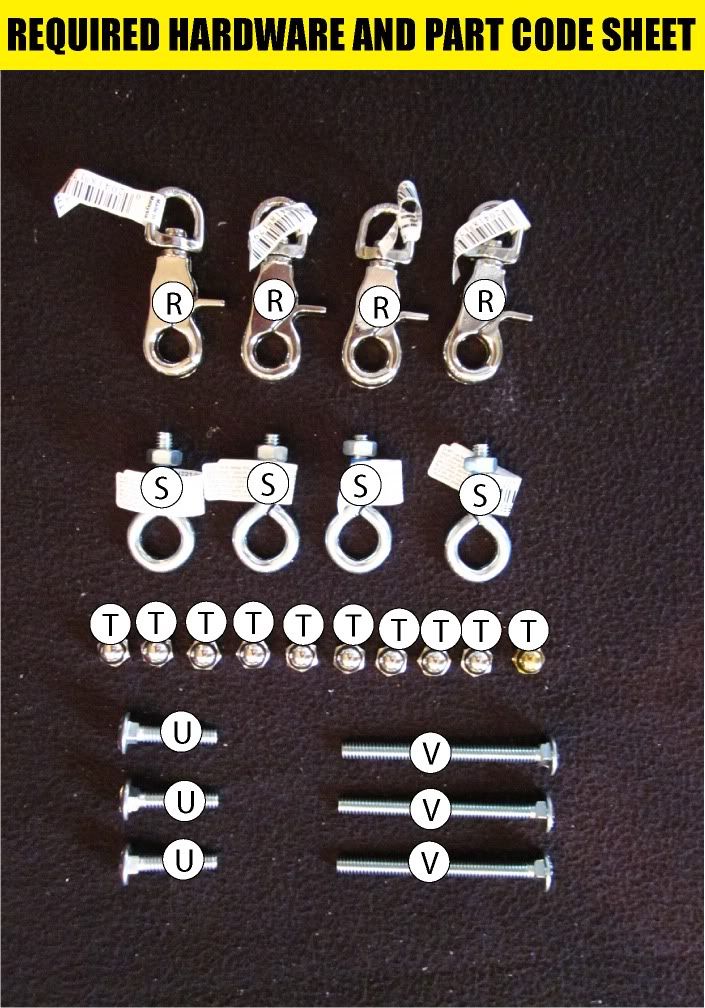
Note where it says “…PART CODE SHEET”. As you can see in the images, ALL of the parts correspond with a letter. These letters will be used in the step by step instructions to identify the pieces required for that particular step.
Below is a comprehensive list as to the specific pieces that each letter corresponds to:
A. 1/2” PVC cut to 21 1/2”
B. 1/2” PVC cut to 18” (18 3/4” for Super Fat Cat owners)
C. 1/2” PVC cut to 5 1/2”
D. 1/2” PVC cut to 1 1/4”
E. 1” PVC cut to 1 1/2”
F. Cut down 1” T connector
G. 1 1/2” to 1” reducing T connector
H. 1” to 1/2” reducing elbow
I. 1 1/2” End Cap
J. 1 1/2” PVC cut to 2”
K. 1 1/2” PVC cut to 3” (4” for Super Fat Cat owners)
L. 1/2 PVC Elbows
M. 1/2” PVC T connectors
N. 1/2” Screw together connectors
O. 1 1/2” PVC mitered rod holders (45 degree angle cut to 13 1/2” from long point to short point)
P. 1 1/2” PVC square cut rod holder (cut to 12”)
Q. 1/2” PVC cut to 1 3/8”
R. 1/2” Trigger Snaps (clips)
S. 1 1/4” Eyebolts
T. 1/4” Acorn nuts
U. 1 1/4” Carriage bolts
V. 3” Carriage bolts
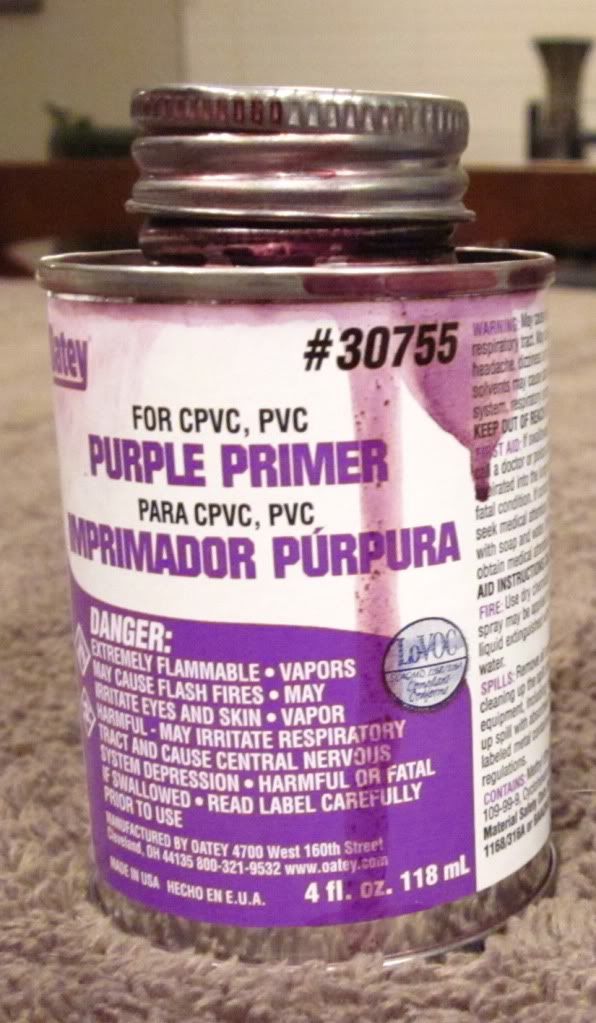
And we are ALMOST ready to build. While you have your parts neatly laid out and prior to building anything, I recommend that you prime the ends of all of your pipe pieces and the insides of all of your connectors. Some people will skip priming their PVC but I do not recommend doing so! I’ve ran the experiment and unprimed connections will pull apart in due time. Plus, priming is really easy so you may as well just do it! Use the purple primer that you bought at the hardware store…
…and put a ring of primer no less than 1/2” wide as shown in the images below…
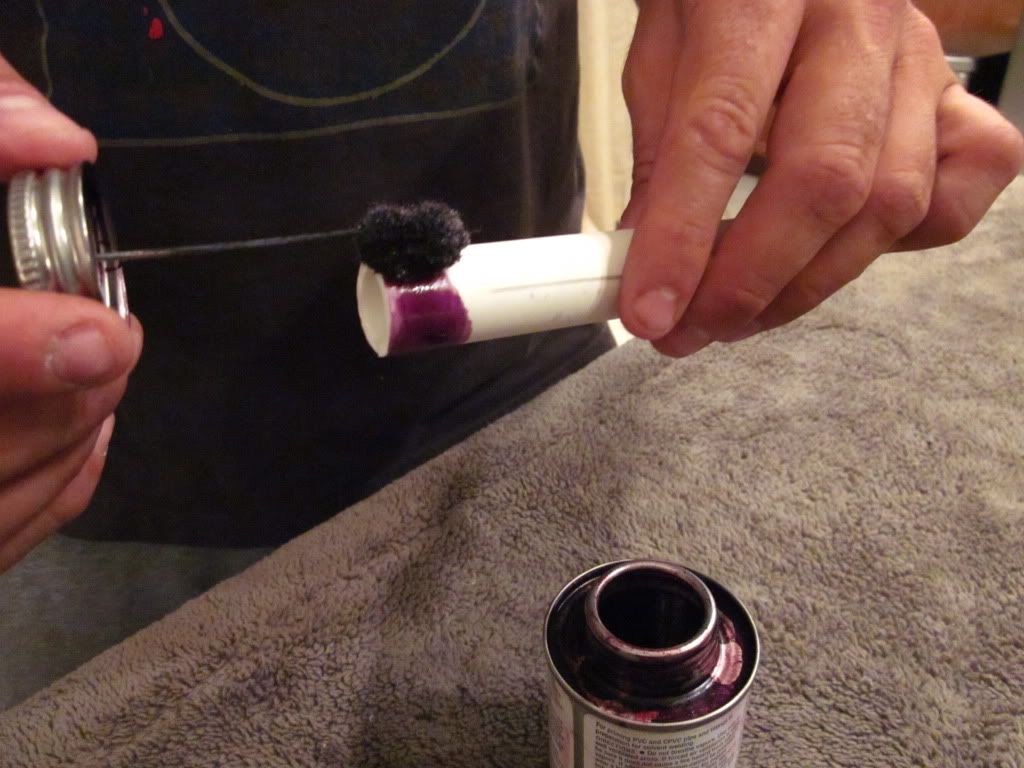
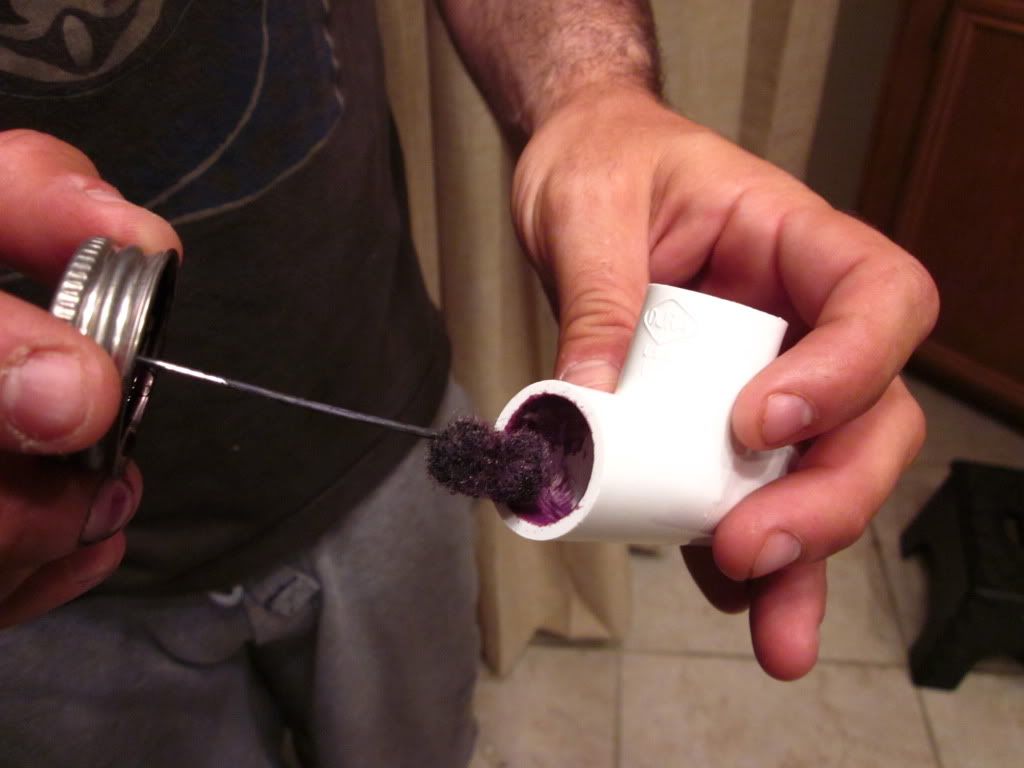
Doing this all in one shot will save you a heap of time during the build! And with that…LET’S GET BUILDING!!!
STEP 1 – THE SIDE FRAMES
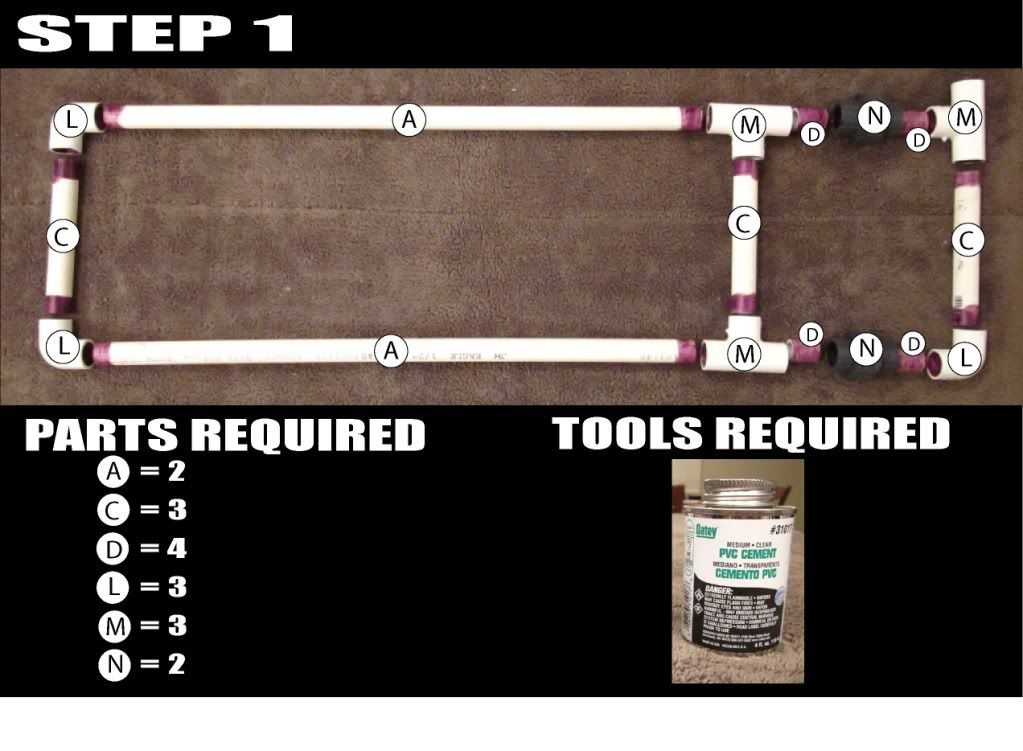
Gather your materials and your PVC cement and lay everything out as shown in the image above. YOU WILL REPEAT THIS STEP TWICE AS THERE ARE TWO SIDE FRAMES IN THIS BUILD!
Begin by grabbing the “C”’s and the elbows (L’s) and T connectors (M’s) that they will fit into.
Apply a generous amount of PVC cement BOTH to the outside of “C” and to the insides of the connectors ONLY where “C” will fit in. Push these pieces firmly together MAKING SURE THAT EVERYTHING STAYS SQUARE AS SO…
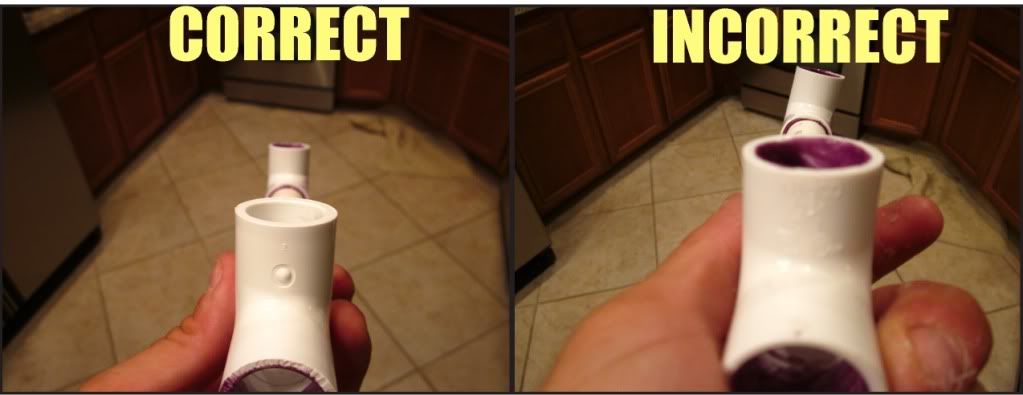
After assembling the 3 vertical pieces, you can now proceed with gluing the remaining elements of Step 1 together. With the small connecting pieces (“D”’s), be sure that plenty of the pipe is shared among the 2 connecting pieces that it fits into. Also, once again, BE SURE THAT EVERYTHING STAYS SQUARE LIKE SO…
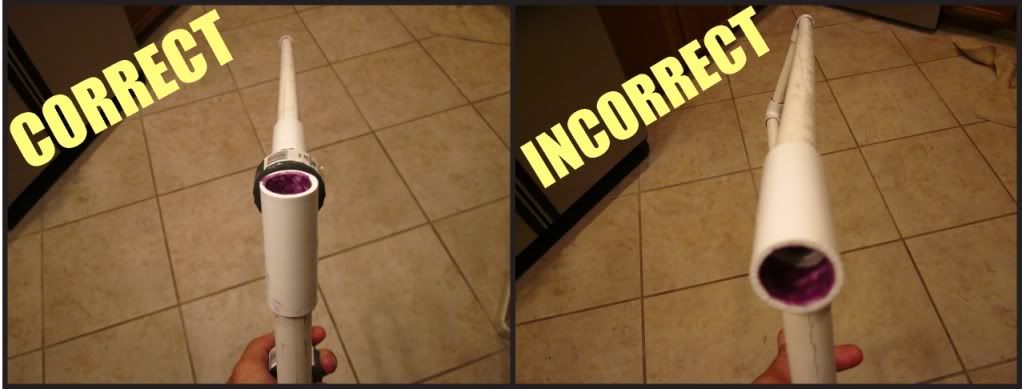
When you finish one side, then start the other! You should end up with two perfect replicas as so…
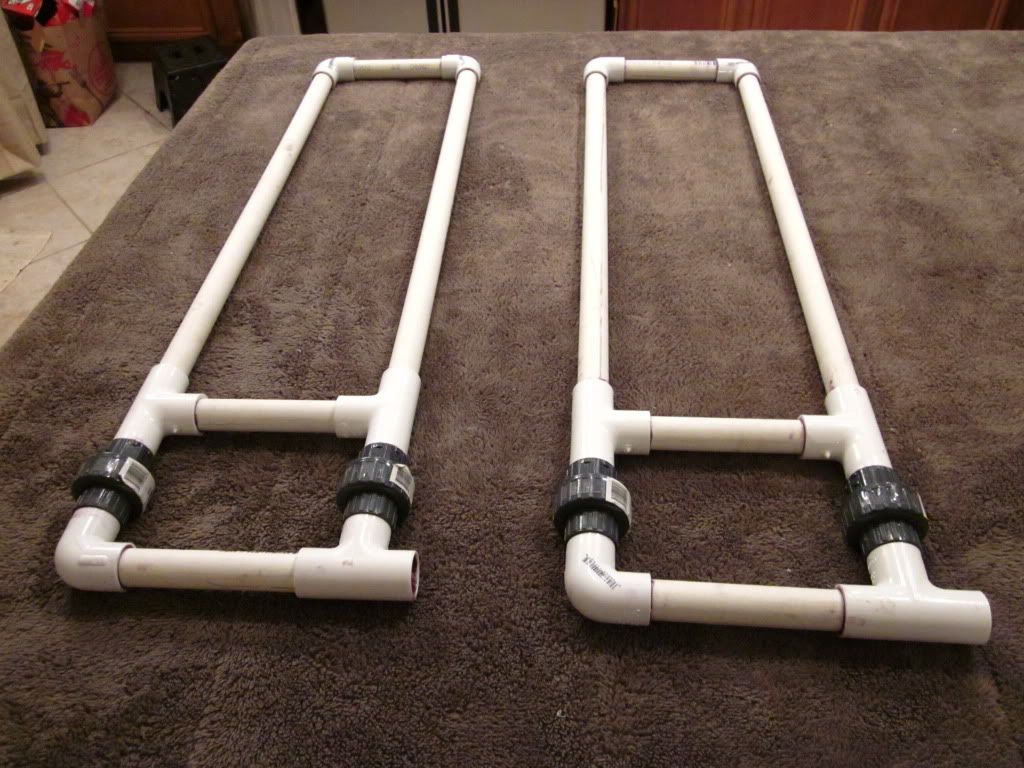
On to step 2…
STEP 2 – Back Braces
The back braces are an absolutely critical element to this build. They stabilize the entire frame so that when you go to put a rod in it or grab a tool, it is absolutely RIGID! They also provide an additional point of attachment for things like net holders and camera mounts.
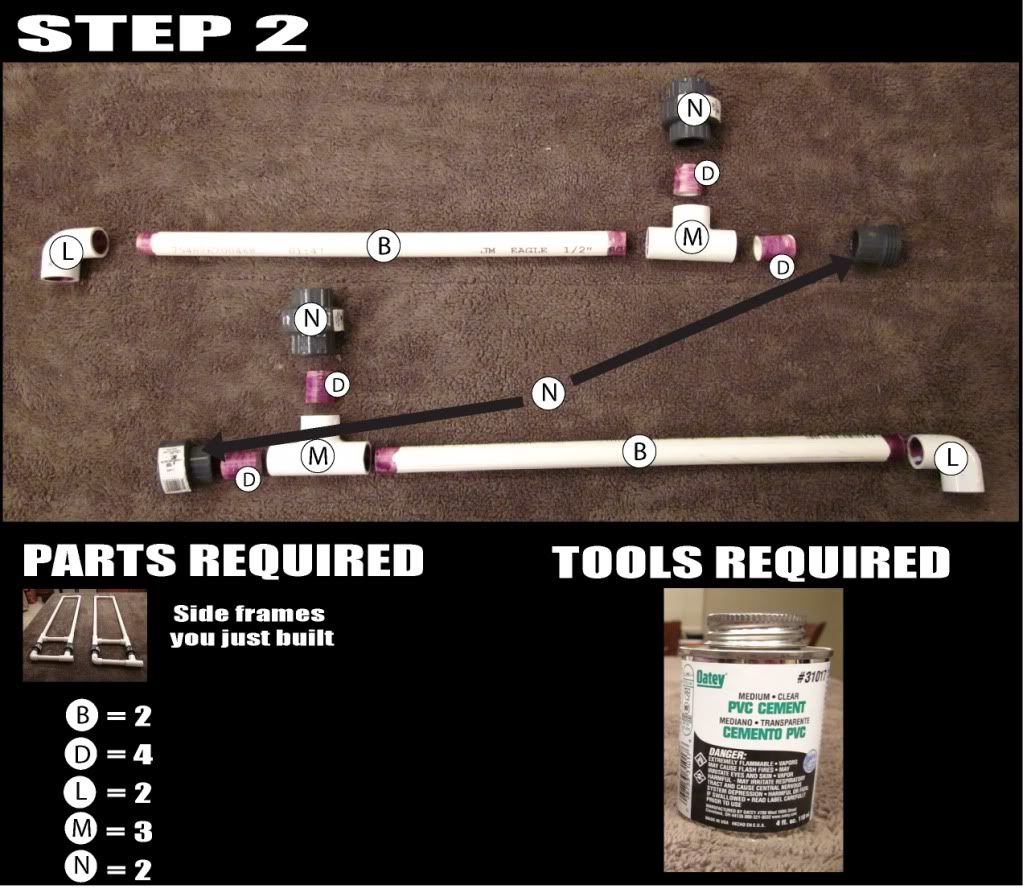
We are now building a LEFT AND A RIGHT back brace. It is critical that you do so as THESE TWO BRACES ARE MIRROR IMAGES OF EACH OTHER AND NOT EXACT REPLICAS!! I THOROUGHLY RECOMMEND READING THROUGH THIS ENTIRE STEP BEFORE BEGINNING YOUR BUILD OF THE BACK BRACES!!! This is a simple step but it is critical that you establish a left and right side and that all pieces remain square to each other and to the 2 side frames you just built!
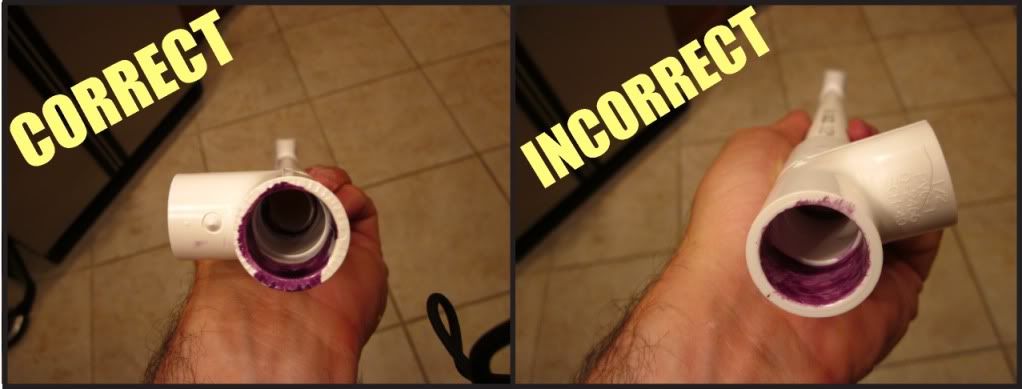
Begin by gluing the elbows (L) and T Connectors (M) to the cross braces (B). The elbows need to be offset from the T connectors by exactly 90 degrees as so…
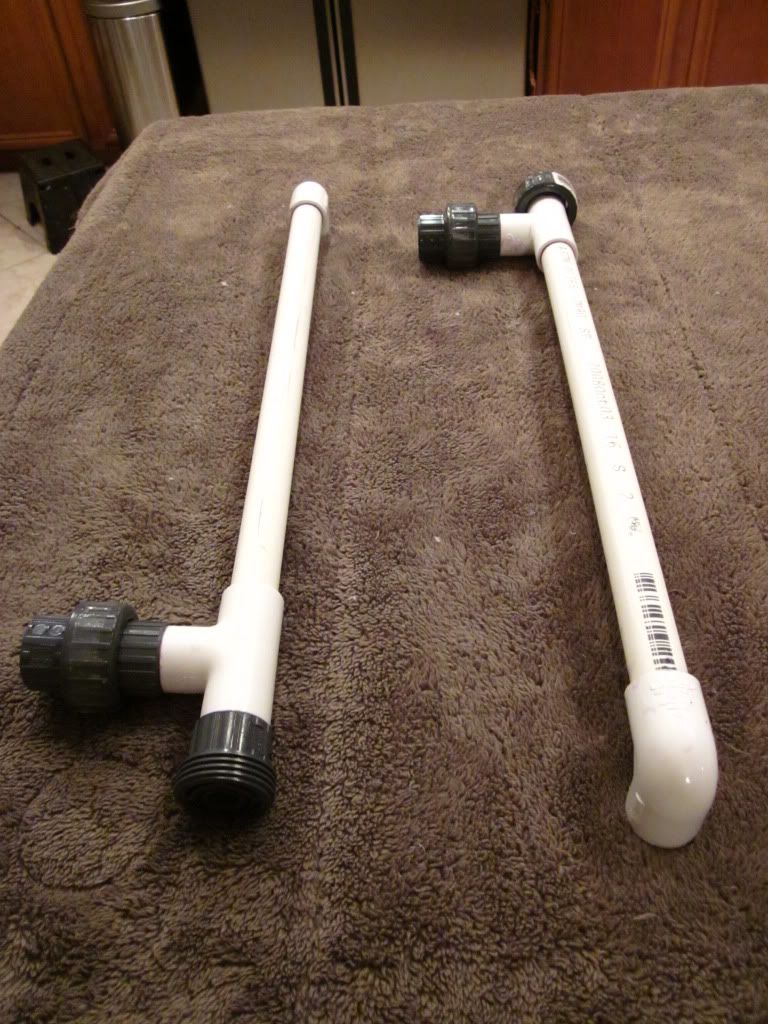
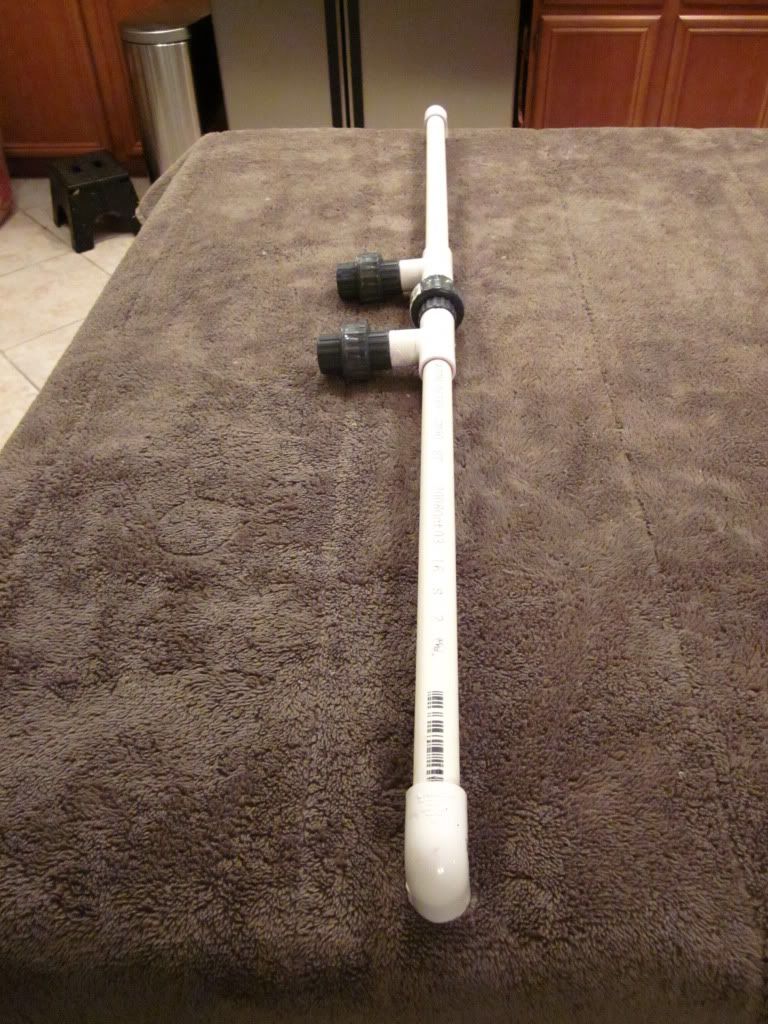
After doing this on BOTH the left and right side, begin gluing the remaining pieces (except for the side panels you previously built…those are next!) in Step 2 together. After you have everything assembled, it should look like this…
Now grab those two side panels and position them so that they are ready to be secured to the back braces. Secure 2 “D”’s in the open ends of the elbows (L) on the back braces. Now slide the entire back brace into position, gluing the 2 D’s you just installed on the back braces into the open vertical T connectors on the side panels you built. BE SURE THAT EVERYTHING IS SQUARE!!!! Here is what you should end up with…
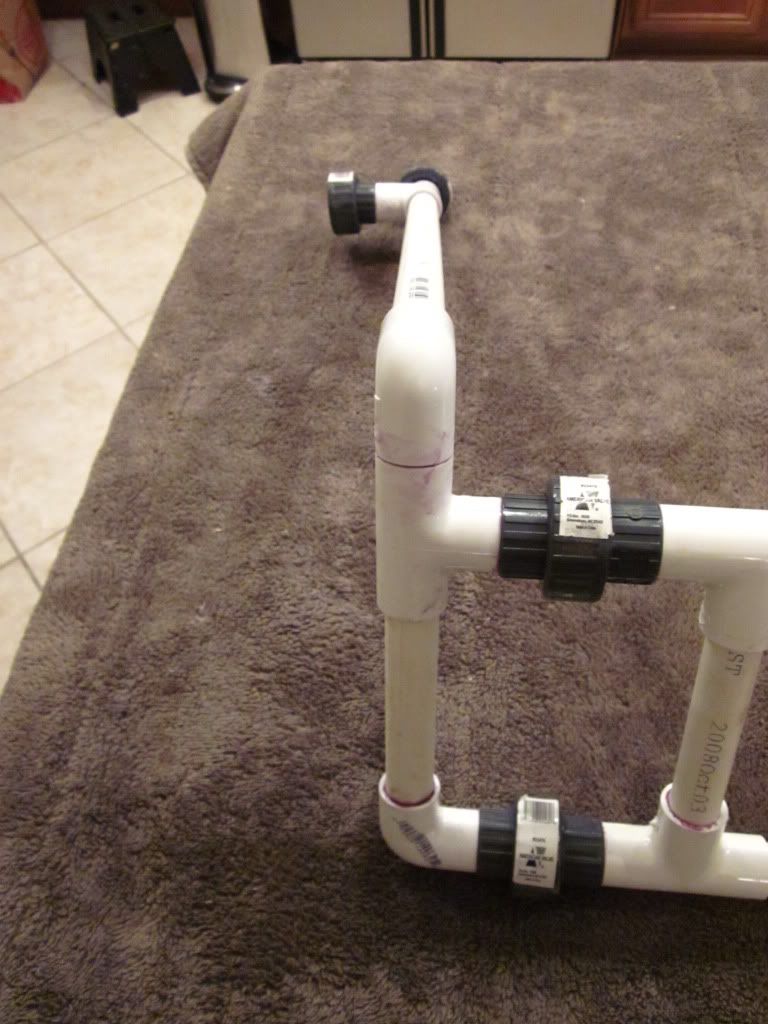
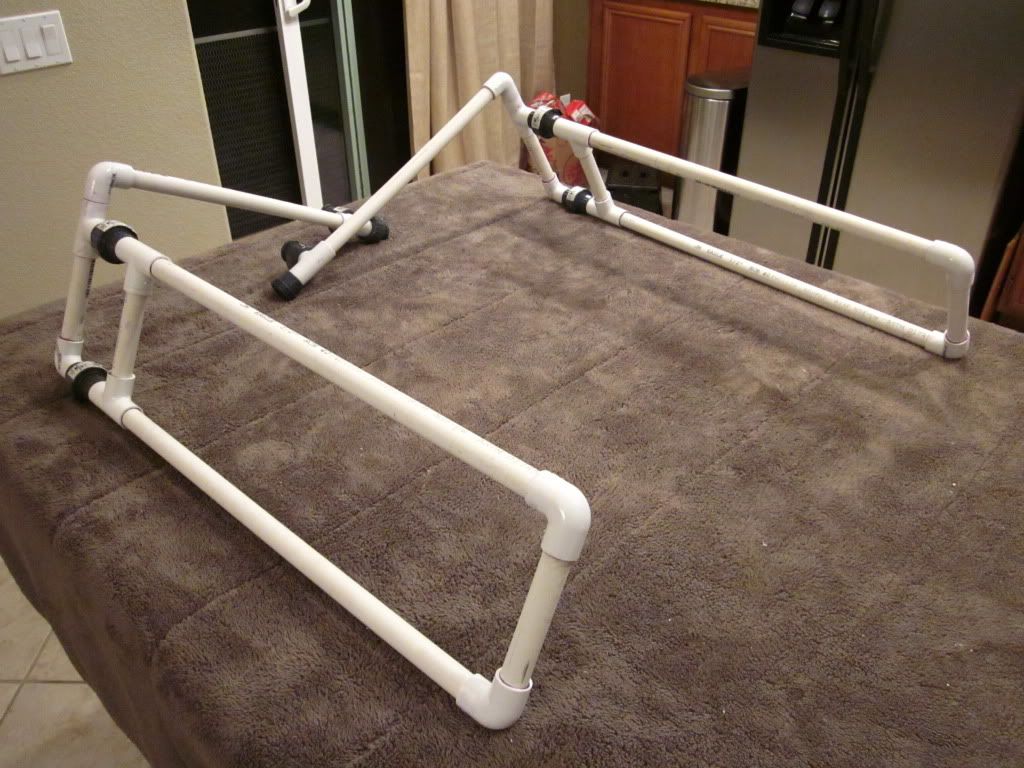
And as you can see, YOU’RE GETTING THERE!!! Just a few more steps away from fishing bliss!
STEP 3 – The Back Linkage
The Back Linkage is the final critical structural component of the boat. It firmly locks all of the pieces together forming an integrated unit that could stand alone, even if there were no tube at all! Having a rigid stand-alone frame on your boat is the most robust system that you are going to find. It’s the reason why the camera footage you see taken from my tube is so stable. I also use my back linkage as a net holder and thus the vertical tube. You could also use the vertical tube as an additional rod holder. Or, if you don’t like the vertical tube at all, you can simply alleviate it! But linking the two back braces with the Back Linkage is critical to having the most robust connection possible.
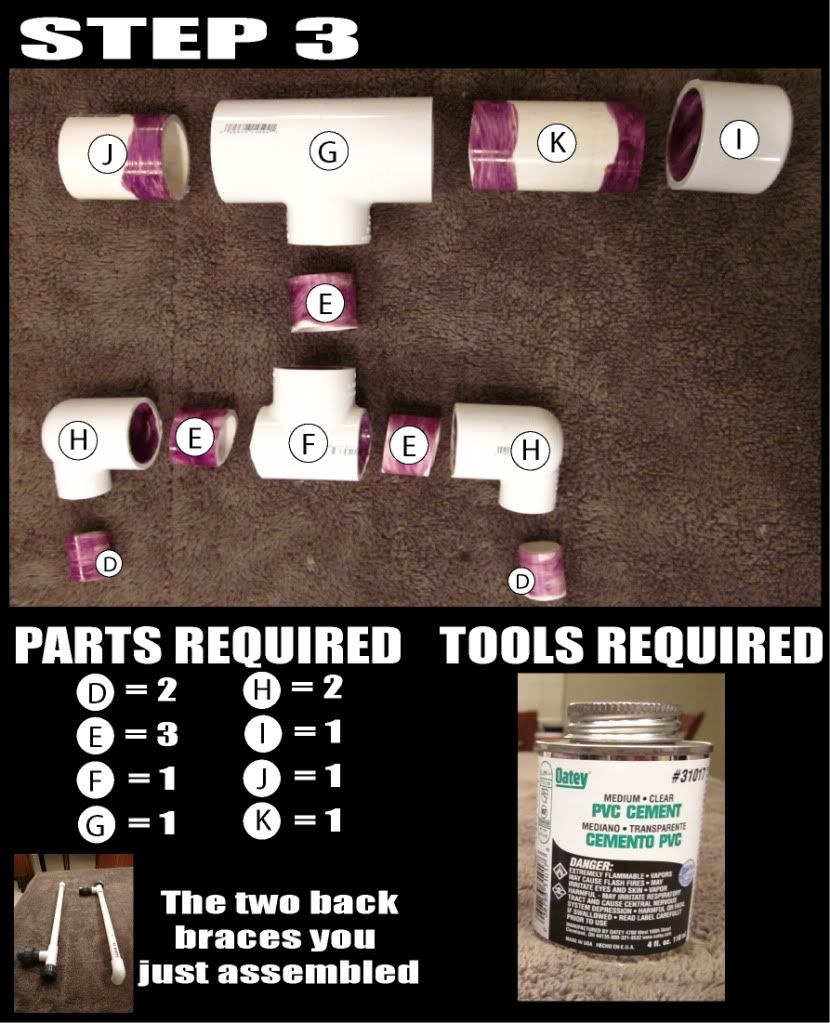
You can begin assembling the Back Linkage wherever you wish. The only requirement is that the J, G, K, and I pieces be perfectly perpendicular to the H, E, F,E,H pieces as so…
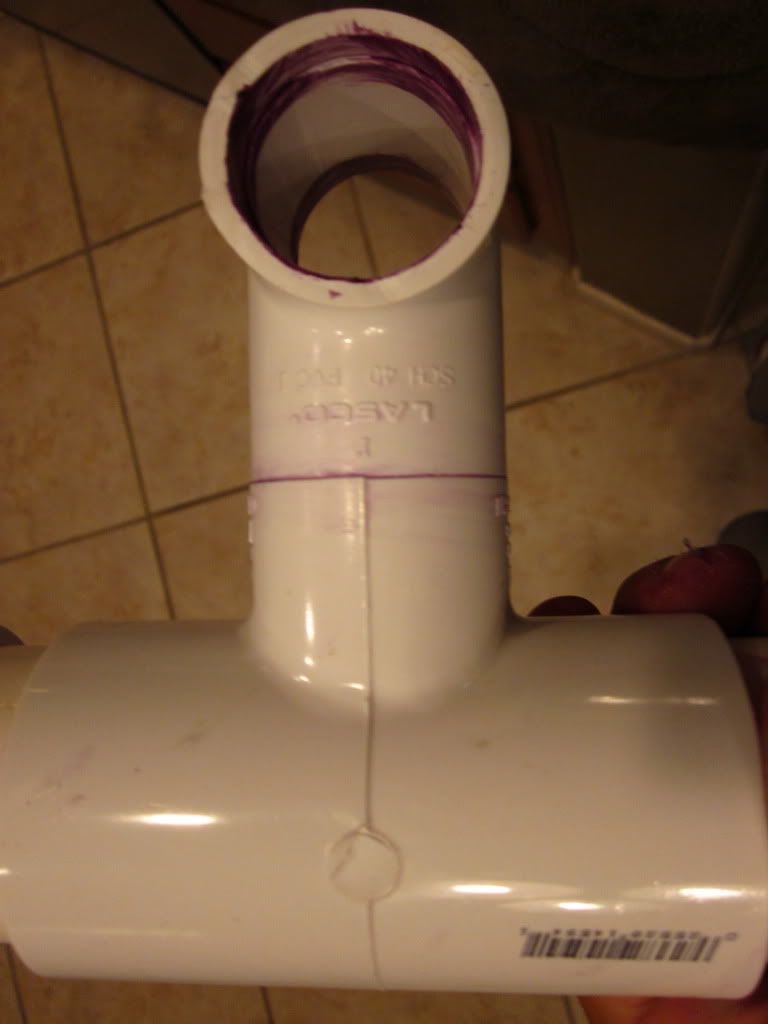
Other than that, assembly is pretty cut and dry! After you are done assembling, DRILL AT LEAST A 1/4” SIZE DRAIN HOLE IN THE END CAP SO THAT WATER CAN ESCAPE IF ANY HAPPENS TO GET IN THERE! If you skip this step, look forward to getting splashed when you go to put your net back behind you!! This is what the Back Linkage should look like up to this point…
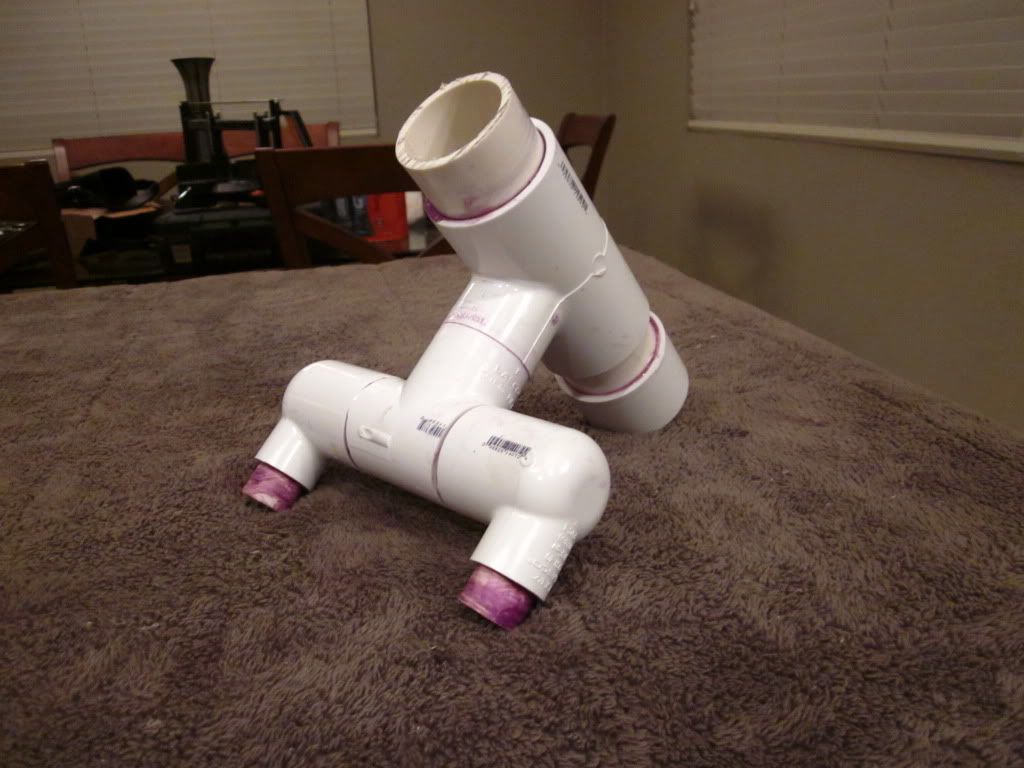
If you want to make this as secure as possible, wrap the connections in electrical tape, ESPECIALLY, the connections in your cut down T connector (F). This T connector has minimal connection and some solid electrical tape wrapping can do wonders for making this a stronger connection.
You now need to insert the 2 exposed “D” pieces (the purple pieces above) into the threaded pieces of the back braces you built previously. This may take a bit of “coaxing” so if it does, no worries! For those that care, the ease of fit will depend on how good your cut was on the 1” T connector in the first phase of this build. After you glue the back linkage to the back braces in place, here is what you should have…
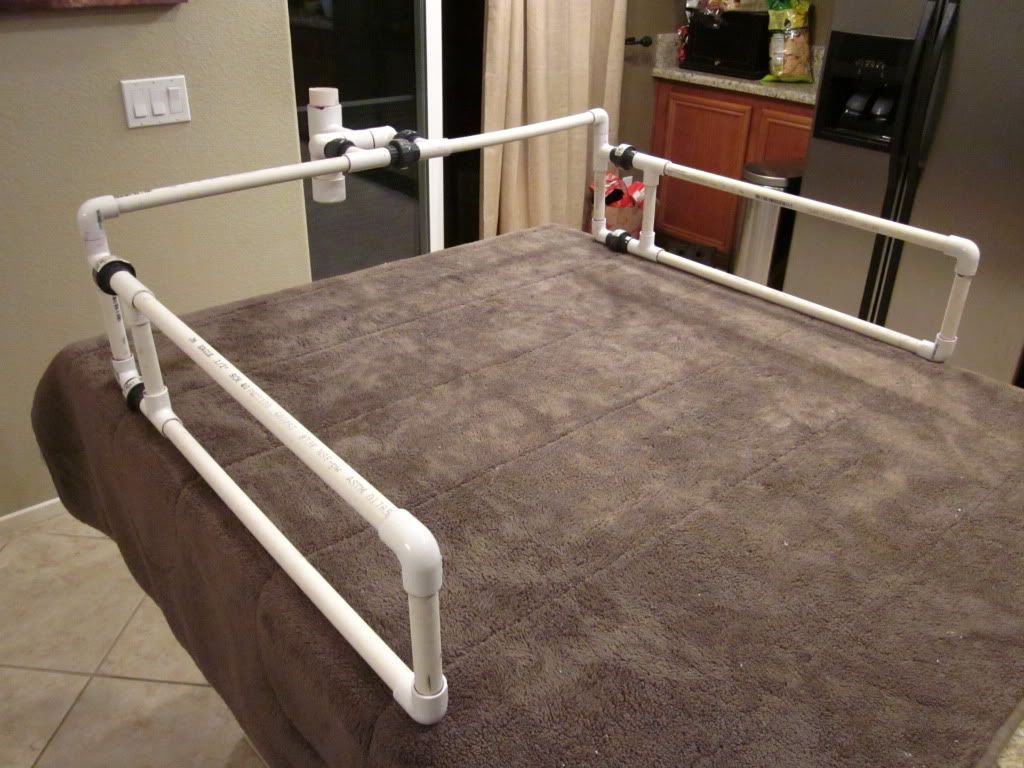
You now have what looks like a frame right?!? GREAT! Let’s move on to now attach this frame to the boat so that everything becomes a single, integrated unit.
Step 4 – The attachment hardware
Outcast thought ahead and realized that us anglers may want to do ridiculous additions like this one to our float tubes! With their forward thinking abilities, Outcast supplied all of their float tubes with 2 D-rings on the outside of each of their pockets. These will be our attachment points for our frame…
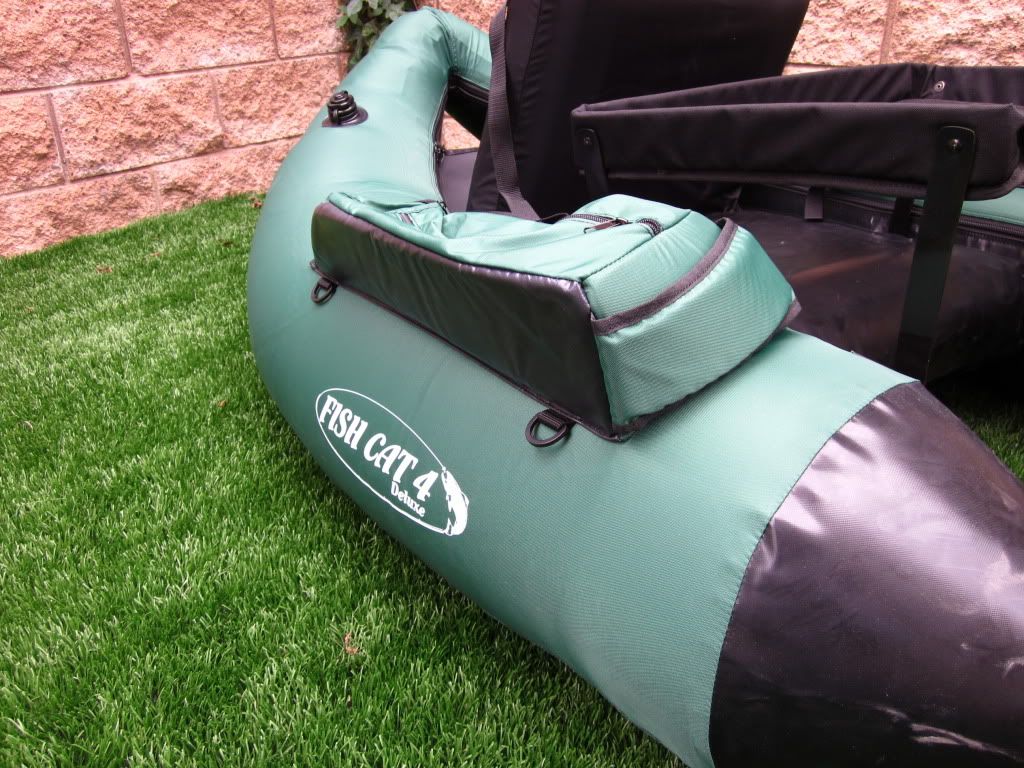
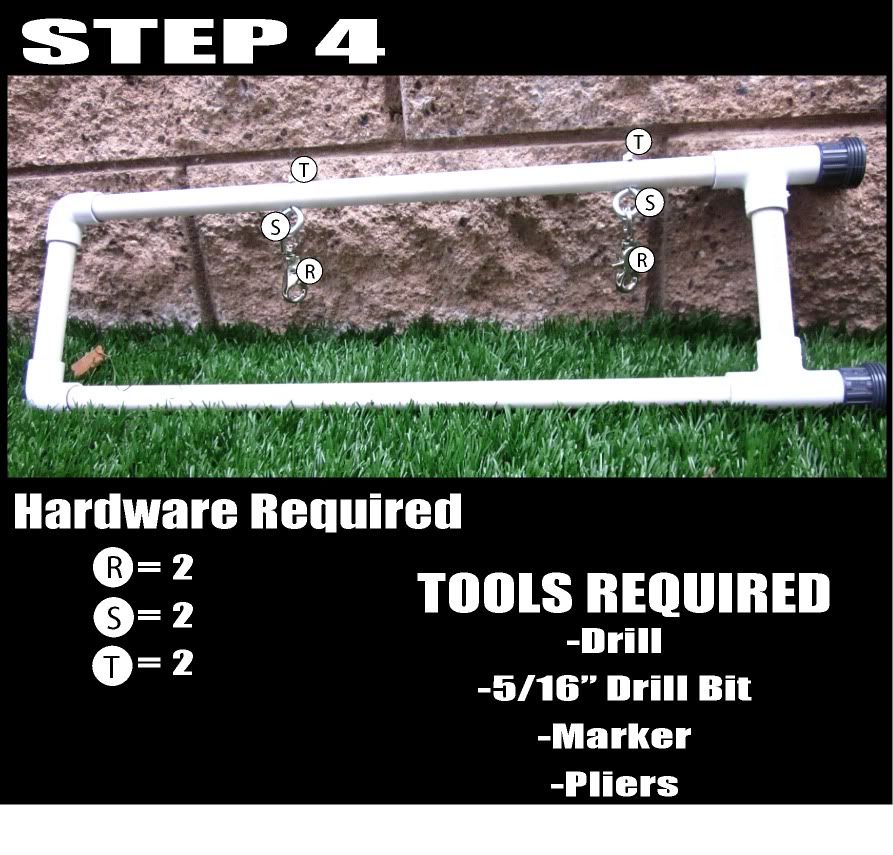
Begin by fully inflating your float tube, seat cushions and all! Following inflation, place the frame that you just built over your boat. Sit in your float tube and lean a bit back in your seat. Then pull the frame forward so that it is just touching the back of your seat. Once the frame is in place, mark the position of all 4 d-rings on the side panels.
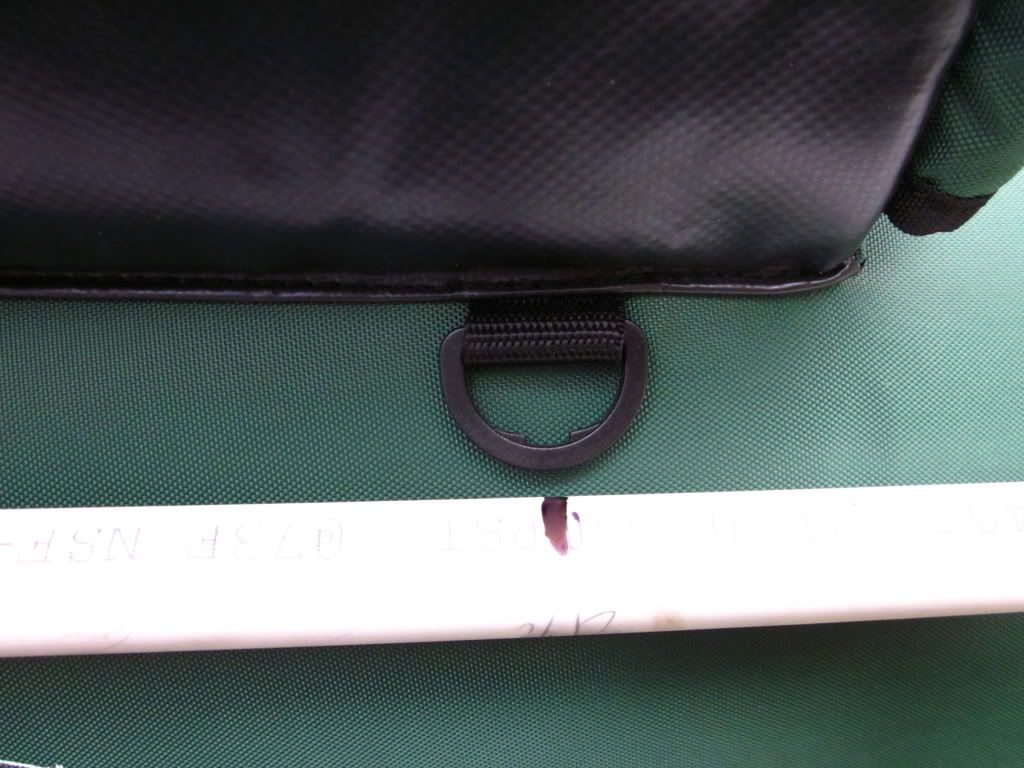
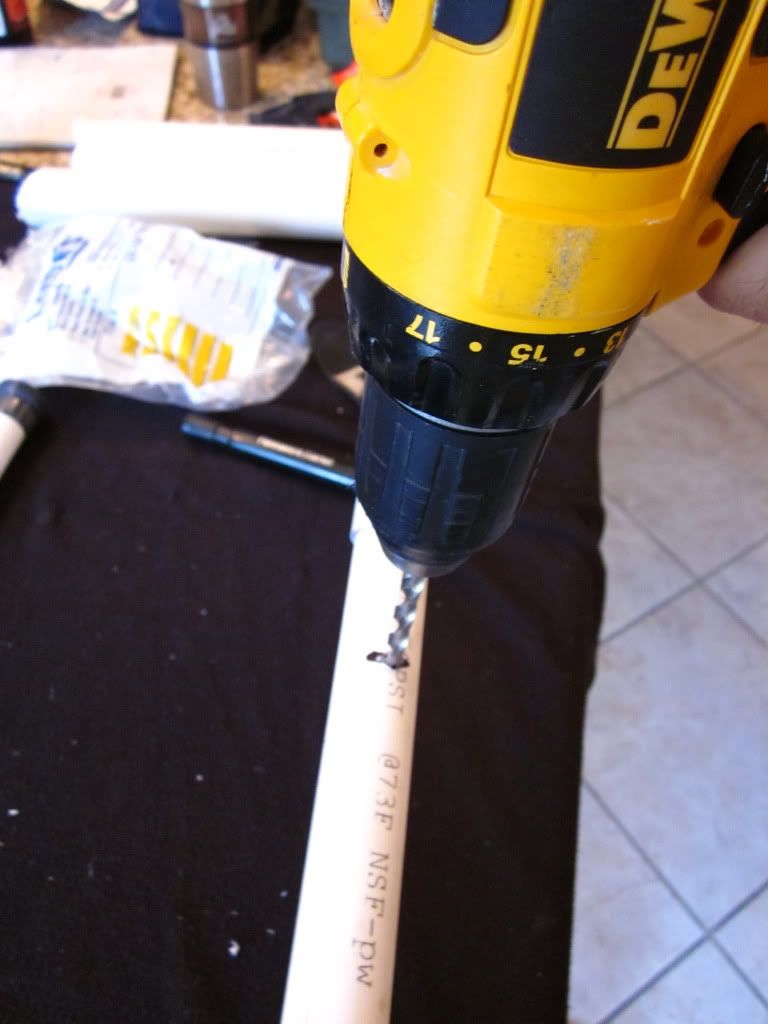
Remove the frame from the boat and remove the side panels from the frame. Locate where you marked the D-rings on the side panels and drill a 1/4” hole PERFECTLY VERTICAL to the side panel.
Next, take your eyebolts and clamp them into a vice or hand clamp. What you are trying to do is slightly open up the eyebolts so that you can loop it through your trigger clips.
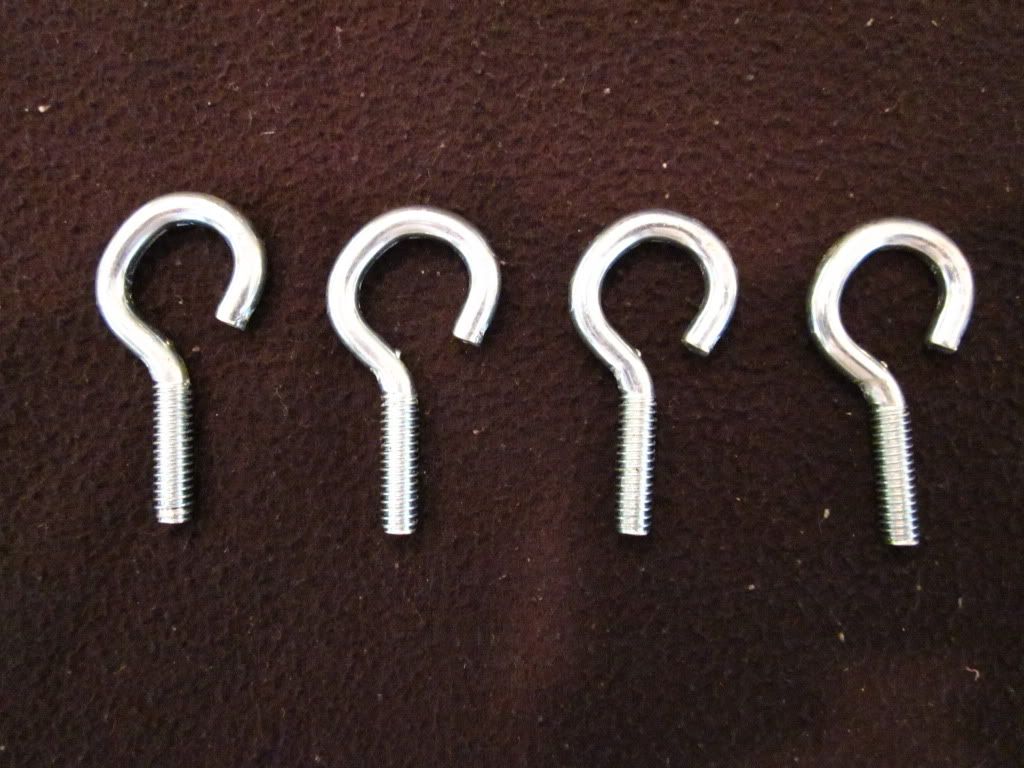
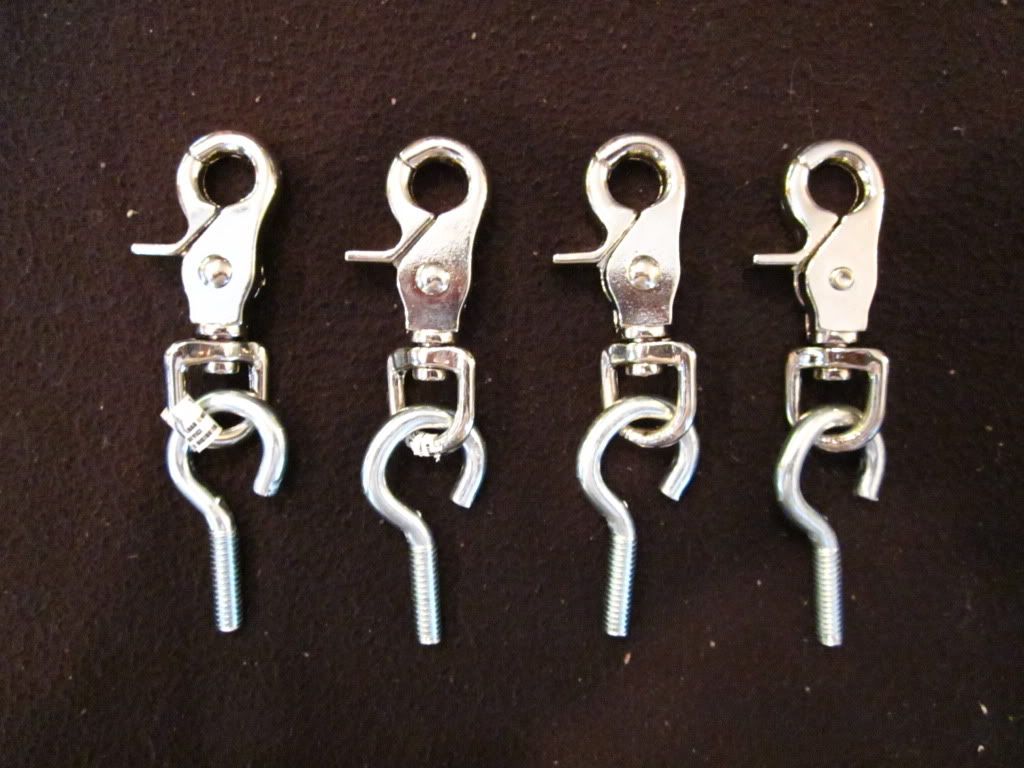
Once you have looped the eye bolt through the trigger clip, use your hammer to close the eyebolt back up. Do this for all 4 eyebolts and trigger clips.
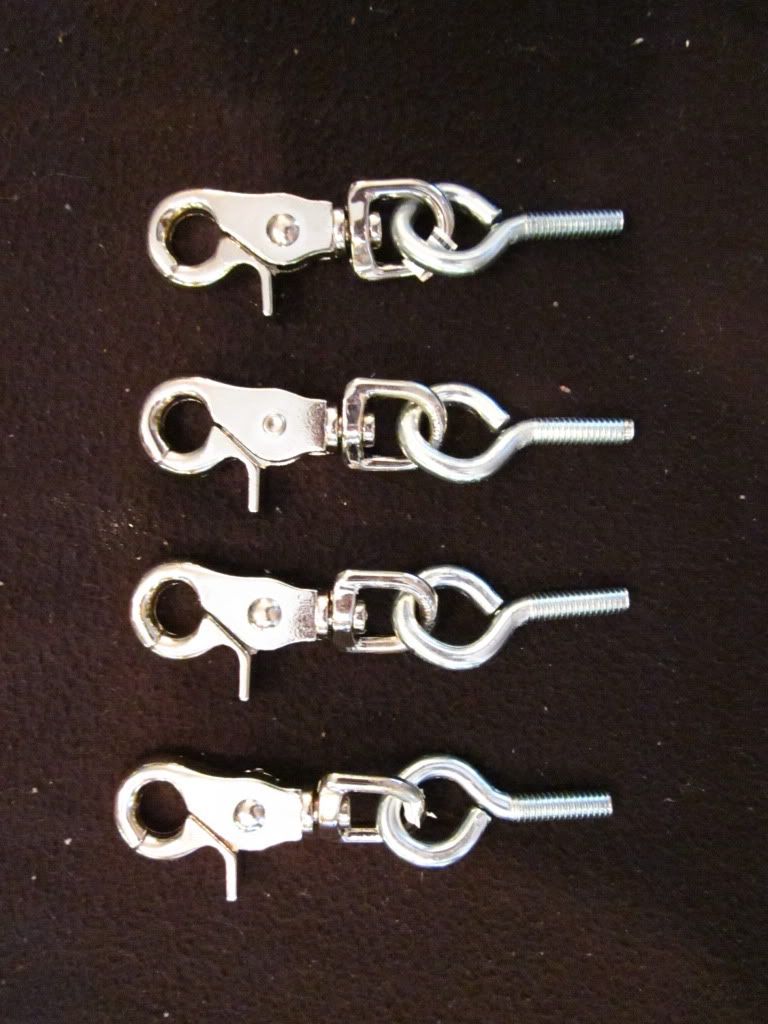
***You can skip this step by using a split ring or a ring from a key chain to link the trigger clip to the eyebolt. The only problem with doing this is that your frame will have more backwards and forwards play to it.***
Now take the eyebolt and trigger clip assemblies you just made and insert them through the holes you drilled in the side panels so that the ring portion of the eyebolt IS FACING DOWN! Use an acorn nut on the top of all 4 assemblies and STEP 4 IS A WRAP!
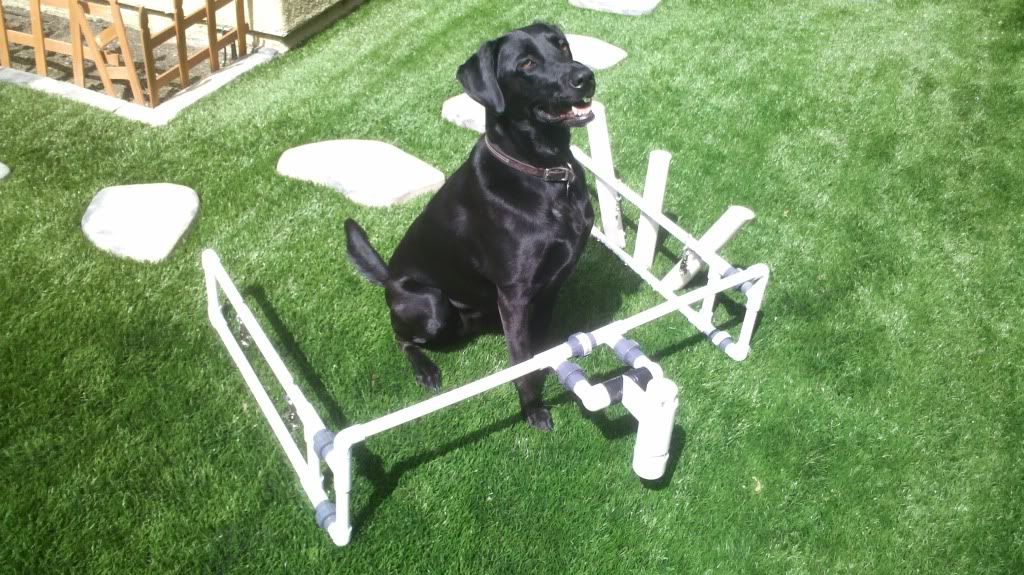
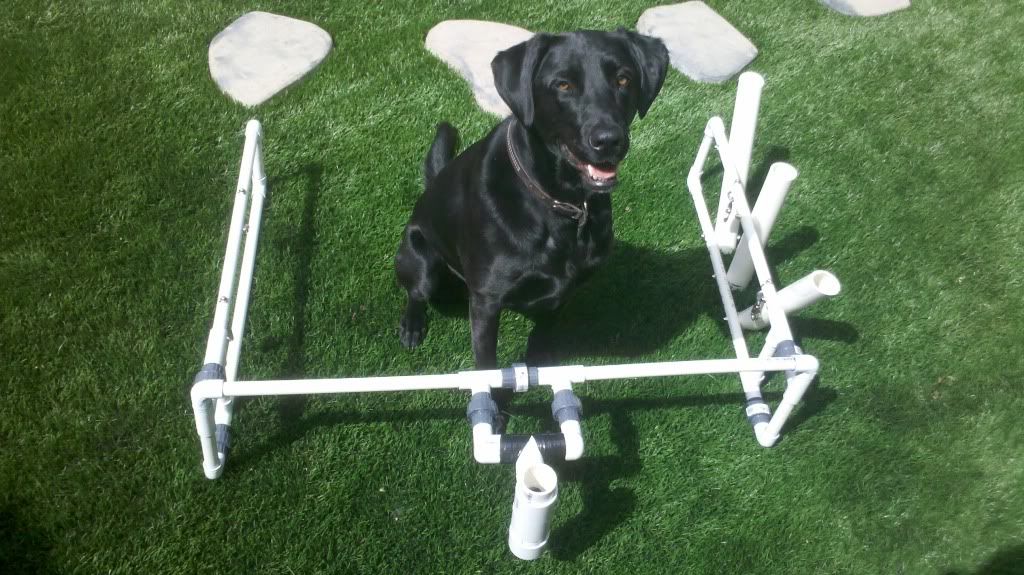
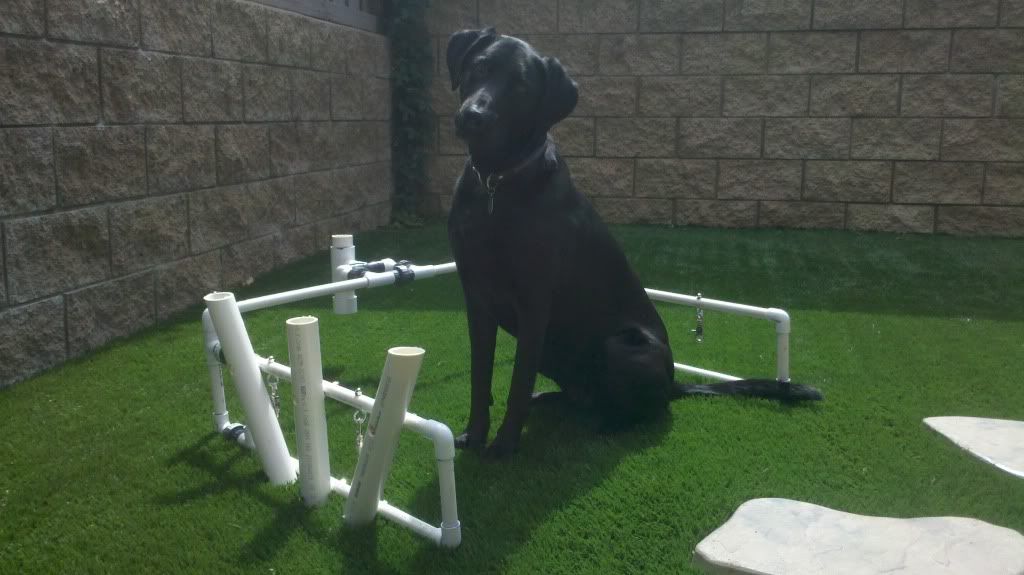
COMPLETING STEP 4 COMPLETES THE STRUCTURAL PART OF THE BUILD!!!!! WOOOHOOOO! This frame that you have now built is the basis for everything I have added onto my tube. It serves as the foundation for mounting cameras, sonar, rods, pliers, nets, you name it! The possibilities are endless! I am going to go on to explain how I have my rod holders mounted but know that THEY DO NOT HAVE TO BE MOUNTED THIS WAY!!! You could stop here and come up with any configuration you want and that would be GREAT!!! But for those that want to trudge on, I’ll show you how to mount the rod holders.
STEP 5 – Rod holders
I am a guy who loves to have a lot of rod holders on board. I feel very strongly that it is of great benefit to you to have a ton of different places to stash a rod quickly so that it is both secure AND out of the way! That being said, I added three rod holders on my frame that I use to not only hold my fishing rods, but I’ll also stash my pliers in there, I’ll throw my net in one from time to time, and the list goes on! These little tubes are used for a variety of purposes and are super handy dandy to have on board.
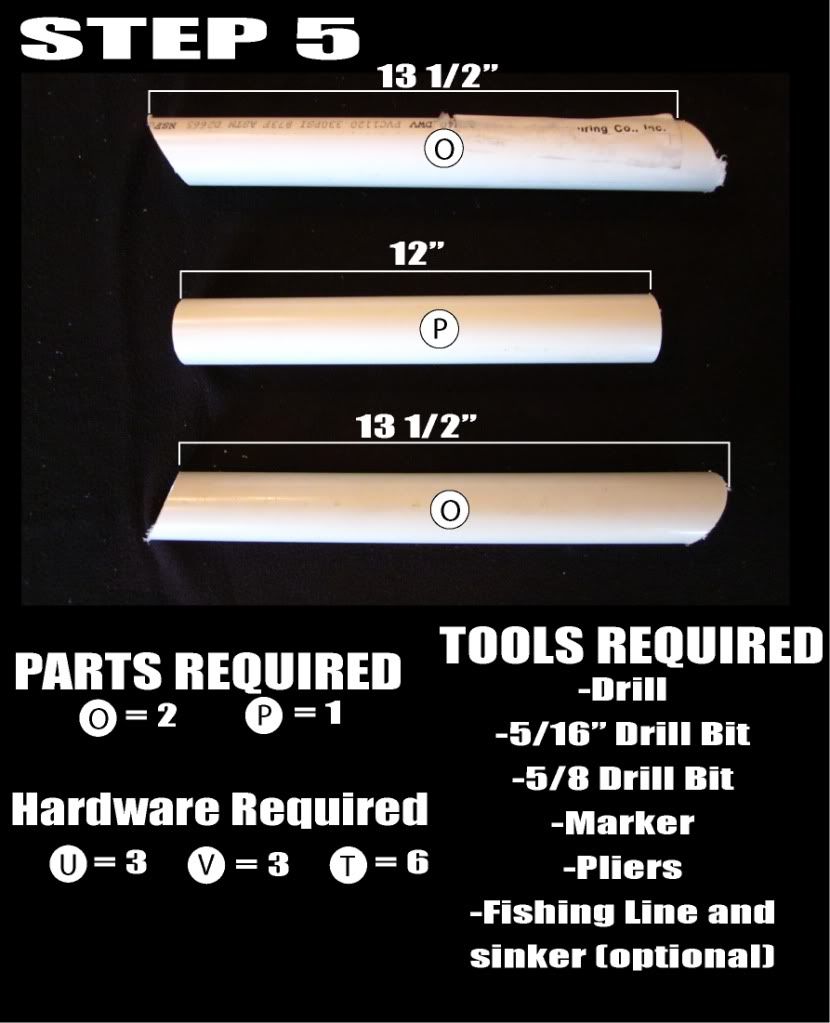
The arrangement of your rod holders is entirely up to you. I like having my 3 rod holders arranged like a fan. The rod holder leaning forward is a great place to set down a rod that has a fish on while you wind in your other lines and/or the anchor. The backwards leaning tube is where I typically throw an extra rod. And the center, vertical tube is often where I keep my pliers.
The first step is to lay the side panel that you are going to mount your rod holders onto down on your workbench (or in my case, the kitchen counter!) in a spot adjacent to a wall. Arrange your rod holders in whatever “array” you see fit and make sure that the bottom of the side panel and the bottom of each of the rod holders are all touching the wall. This will keep everything square and nicely lined up.
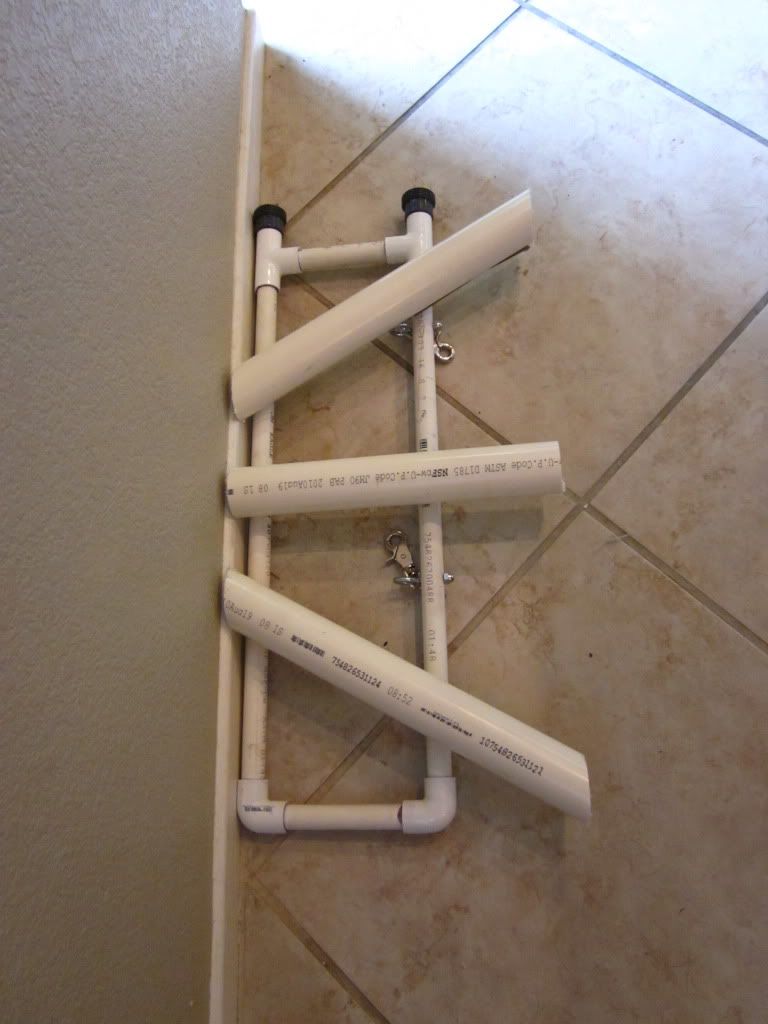
Once you are satisfied with the arrangement, mark the rod holder tube where it crosses the top and bottom crossmembers on the side panel. Also mark the crossmembers on the side panel where they hit the rod holder.
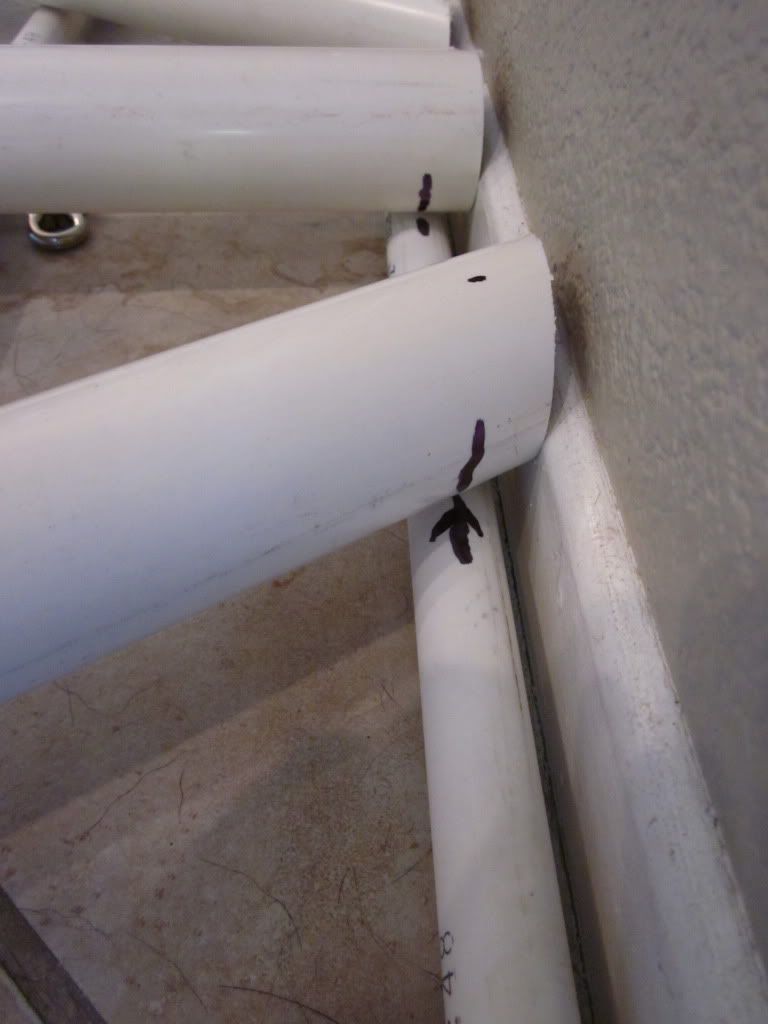
Label the rod holders and the side panel so that you know which rod holder corresponds with each position. Drill THE BOTTOM HOLE ONLY on the rod holder tube with the 1/4” drill bit. When you’ve done this to all three rod holders, reposition them back on the frame. When everything is lined up, use the 1/4” holes you just drilled in the rod holder tubes as guides to drill 1/4” holes in the side panel as well.
Once the bottom tube on the side panel is drilled, grab the 3” carriage bolts and begin to push them into the rod holder tube. Use the 1 3/8” 1/2” PVC pipe as spacers on the inside of the rod holder tube so that you can tighten down the bolt without crushing the tube.
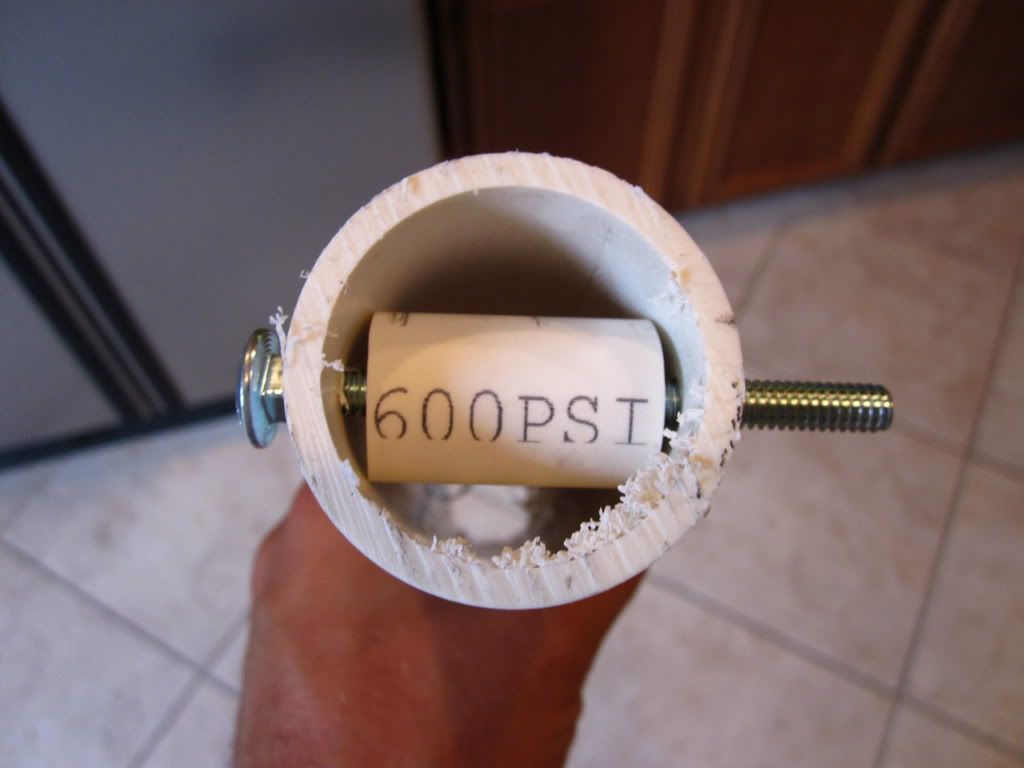
Once the bolt is through the rod holder tube it can be mounted onto the bottom rung of the frame. Secure it onto the frame with an acorn nut. Do not overtighten! Even with the spacer in place it is possible to crack the plastic if you go all Heman on it!!
To attach the top of the rod holder, realign the marks you made on top tube of the side panel and on the rod holder tube. When in position, drill a 5/16” hole through both the rod holder and the top tube of the side panel. Do this for all three rod holders.
To prevent an upper carriage bolt from blocking the rod holder, you have to enlarge the outer hole so that the head of the carriage bolt can pass through it. Do this by using your 5/8” drill bit, being sure to ONLY drill through the outermost hole on your rod holder!
After this hole has been drilled, you now have to finagle the 1 1/4” carriage bolt into position. This is indeed tricky and can become a complete pain in the neck. One great way to get the bolt through is by using a “pull string”. Take a short piece of fishing line and tie it to the end of the threads on the carriage bolt. On the opposite side of the line, clamp on a small sinker. Drop the sinker through all of the holes and pull the bolt through. Works like a charm!!!
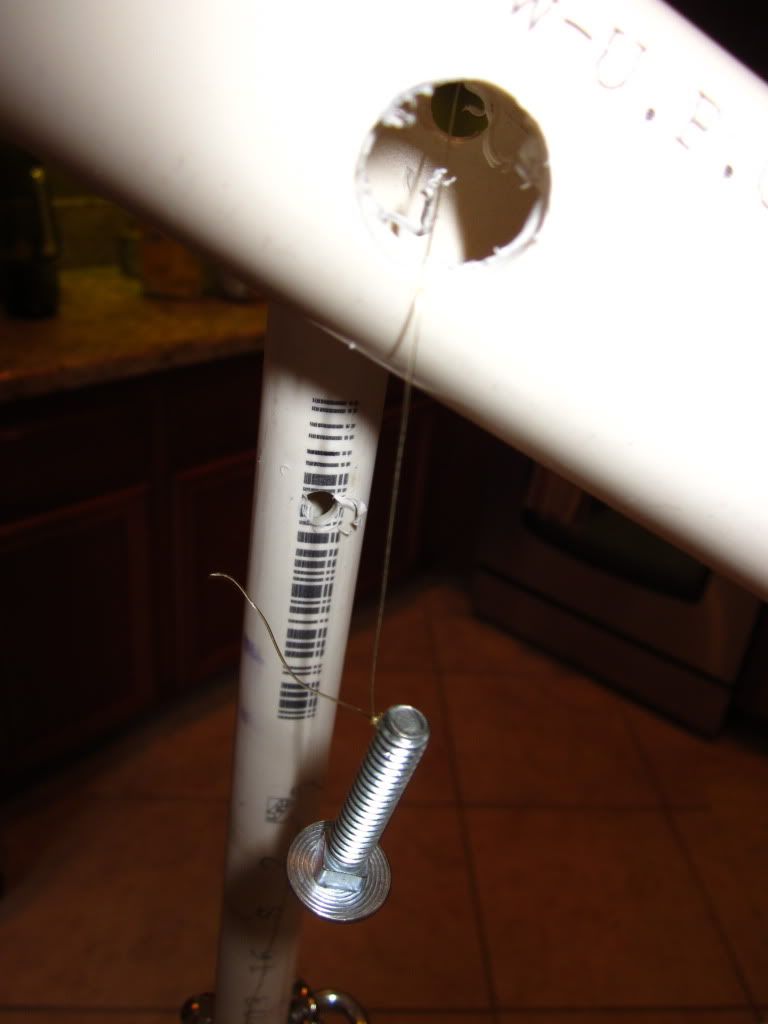
Once you have the carriage bolt in position, secure it to the frame with an acorn nut and BOOM…you’ve got rod holders!!!!
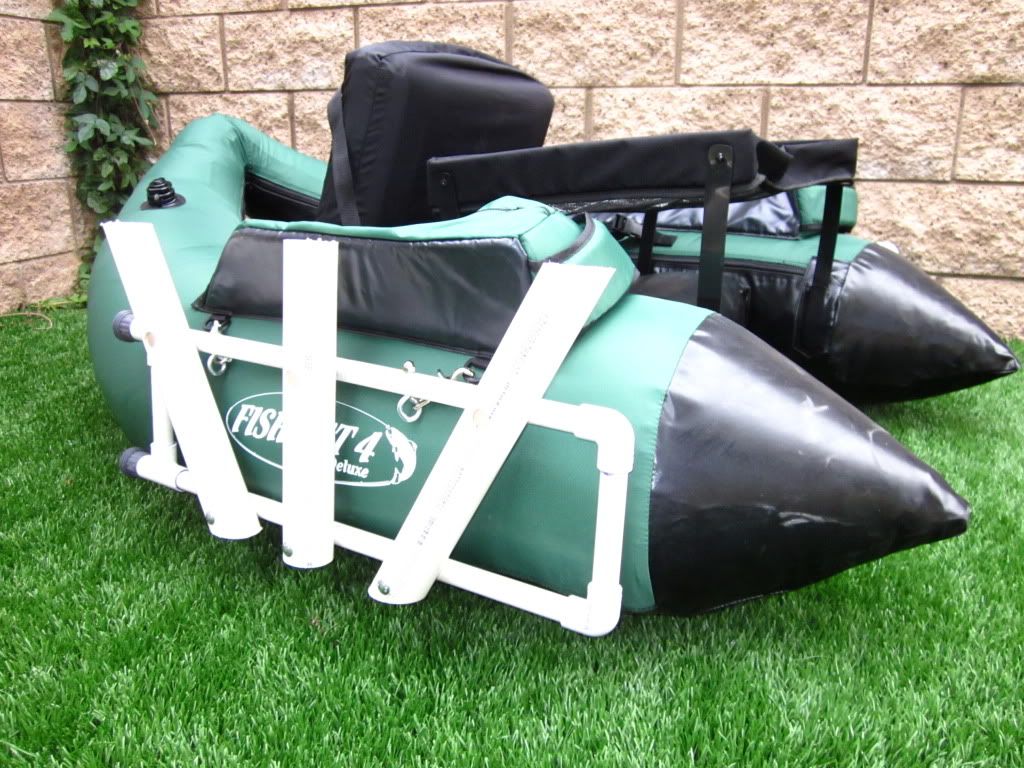
CUSTOMIZATION
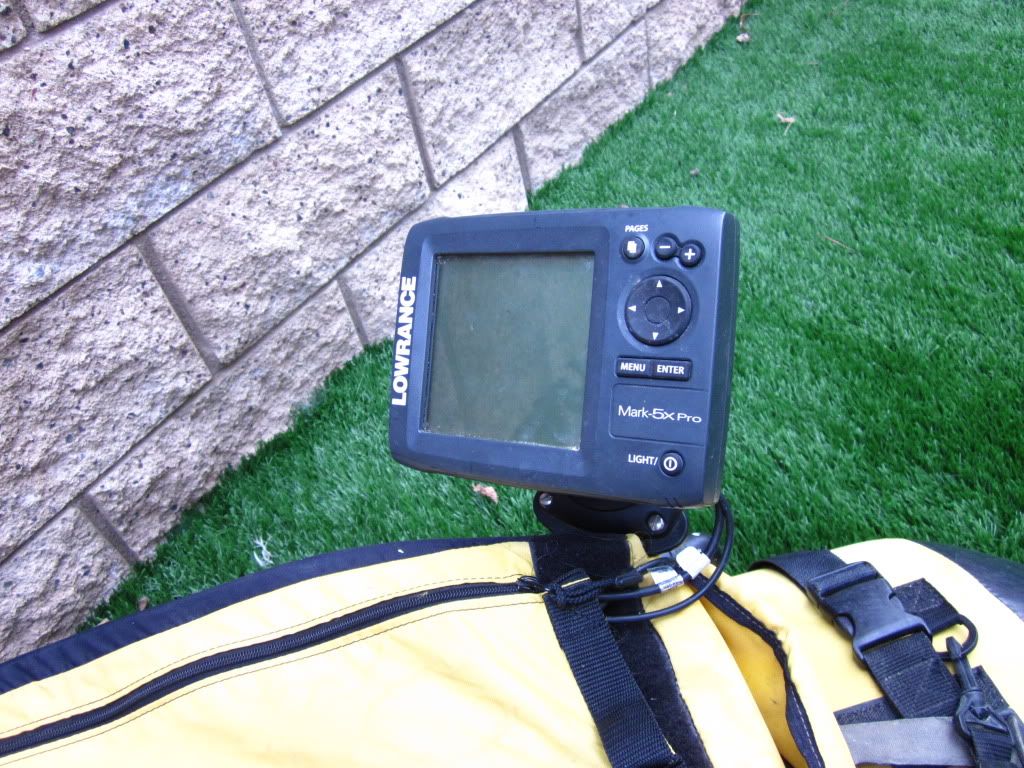
One of the biggest benefits of this system is that it can be quickly and easily customized for virtually anything. Without the rigid frame, I could kiss any steadiness to my videos goodbye!! I’ve figured out a quick and easy way of mounting my sonar. And I’ve got a bundle of other ideas for this thing that would be impossible to even consider without it. I will do detailed write-ups soon on how exactly I have my sonar and camera mounted as this thread is already long enough! But in the meanwhile here are a few detailed pics of the rig on my Super Fat Cat that should clue the tinkerers in on exactly how I have some of the nitty gritty custom stuff set up!!
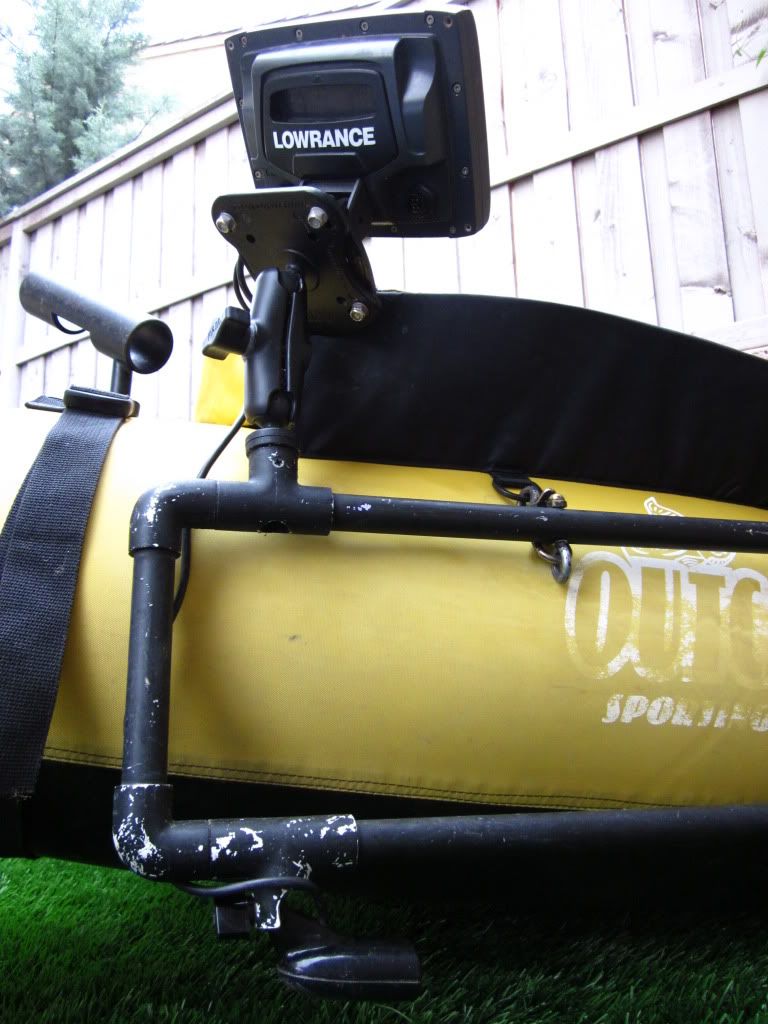
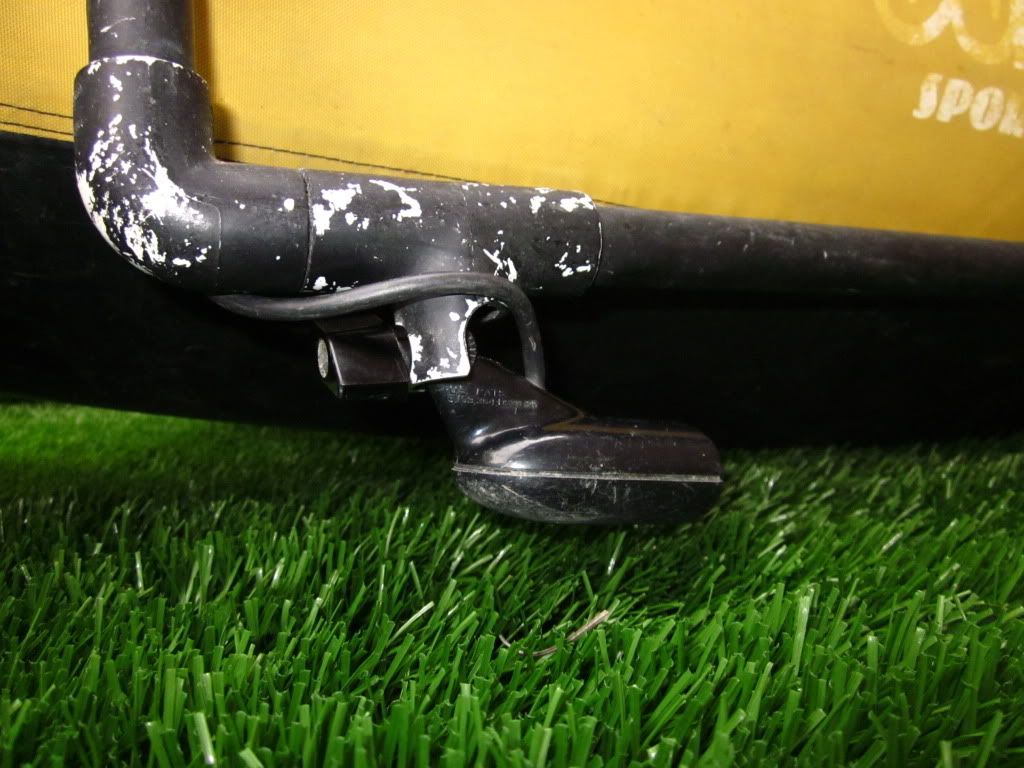
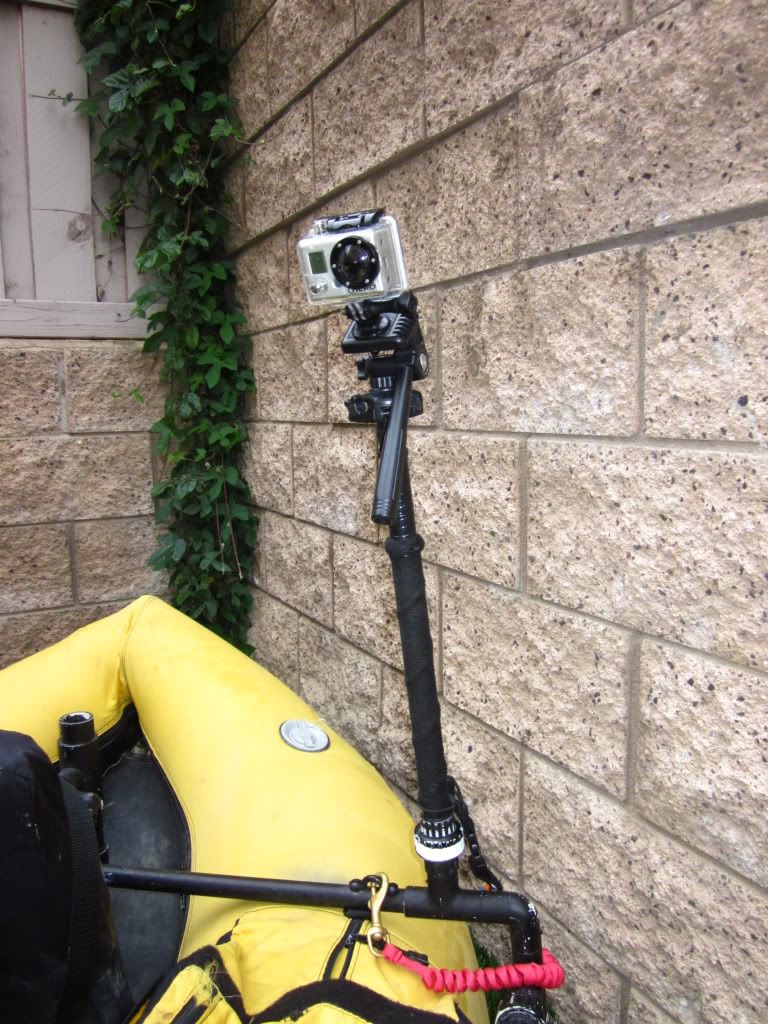
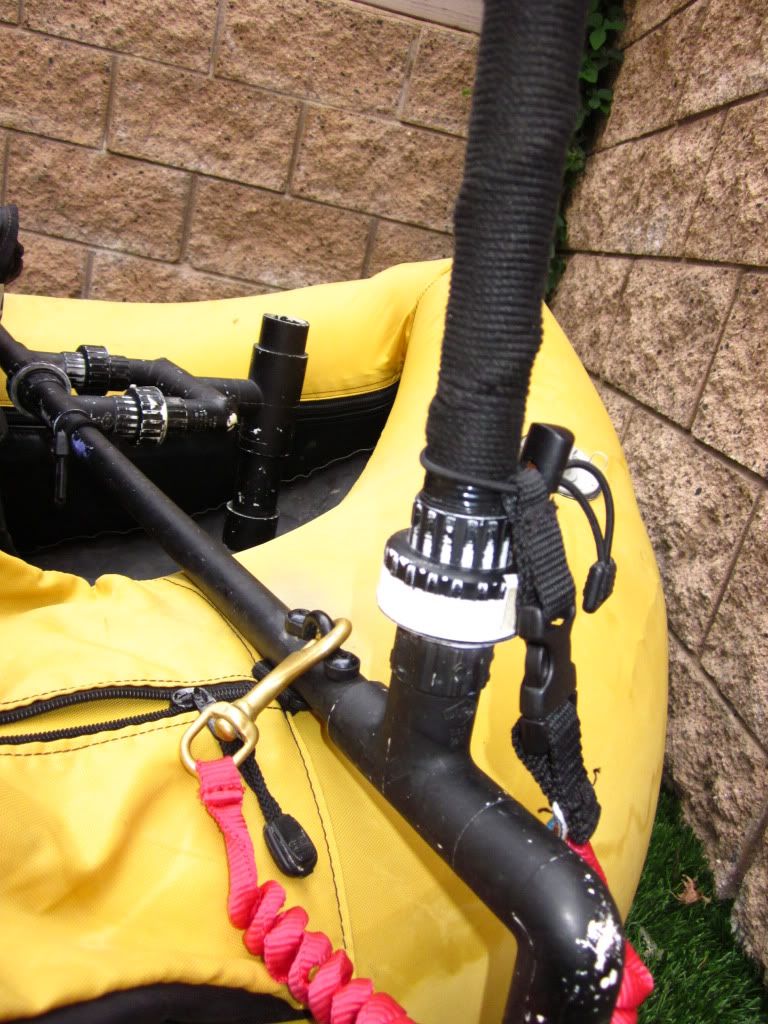
Some of you may want to paint your frame, I know that I did! Painting your frame is quick and easy but I do have a few tips for you. 1) I use the krylon fusion paint. It is specifically designed for painting plastic meaning that it sticks really well with minimal crinkling or running. 2) When you paint your setup, do it with the frame COMPLETELY put together! This will prevent you from painting the threads on the screw together adapter pieces. If you were to paint them it would make assembly a complete pain in the butt! 3) Some of the paint WILL rub off on your canvas. You can see it if you look really close in the pics above. I don’t mind but some people are pretty particular about things!!
TIME TO GO FISH…
So looky what we have here…Father Super Fat Cat and son, Fish Cat 4 Deluxe!!!
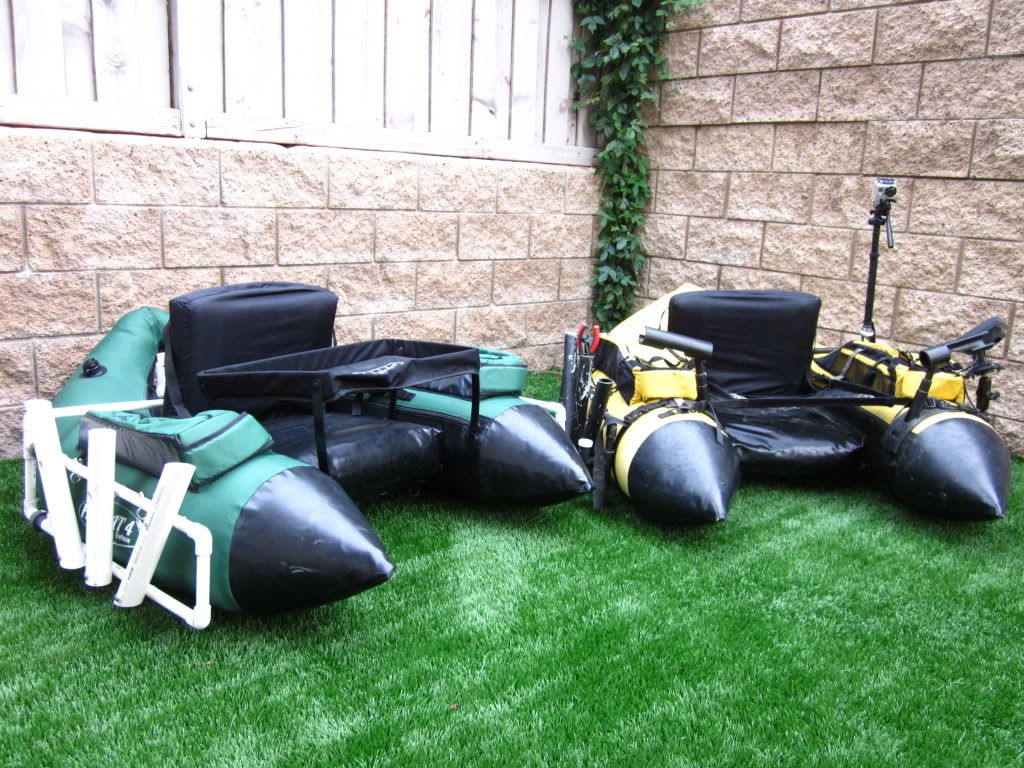
And I think my favorite part about this entire thing is that despite this being a significant component of your ride, by unscrewing the threaded connectors the entire thing completely collapses to become a compact pile of plastic that easily fits inside of your boat bag!
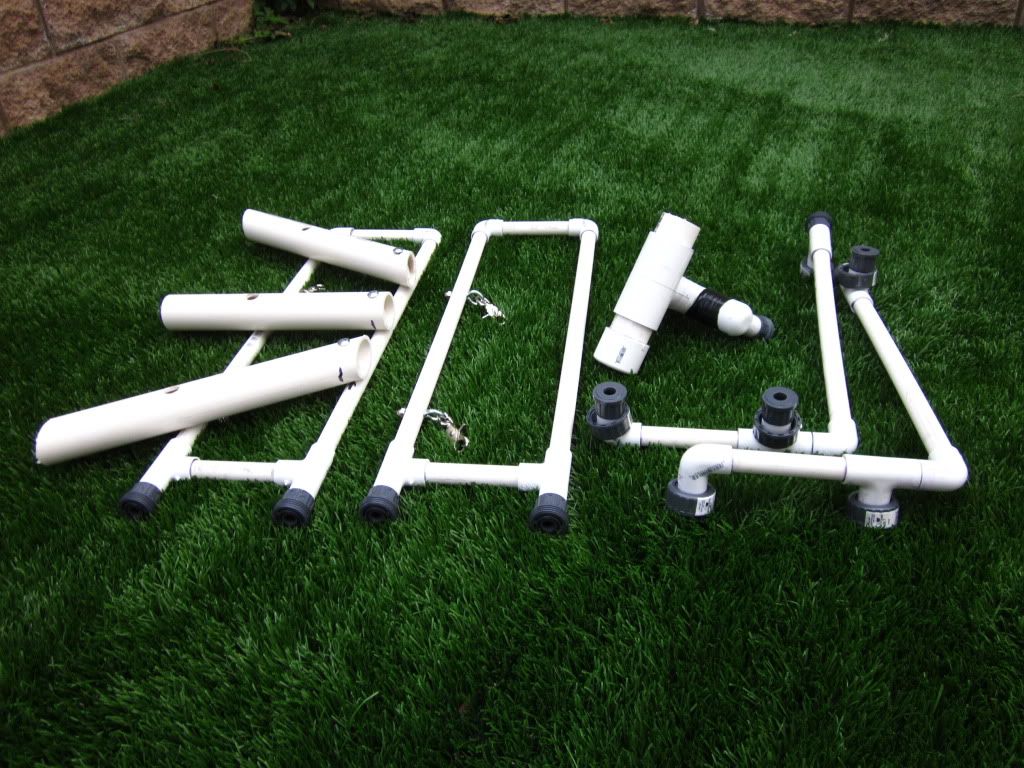
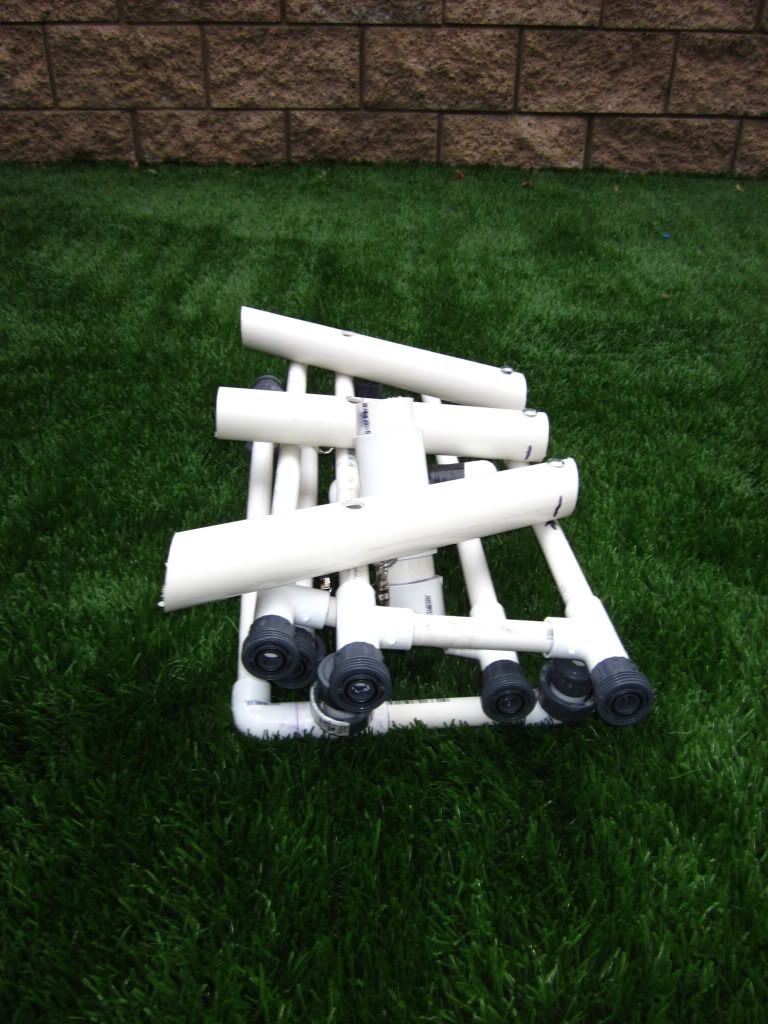
In fact, I can fit my Super Fat Cat, 2 caddis rod holders, an anchor, 2 sets of waders, my wader boots, fins, my pump, backpack straps, repair kit PLUS THIS ENTIRE SYSTEM ALL INTO MY FLOAT TUBE BAG!!!
BEFORE
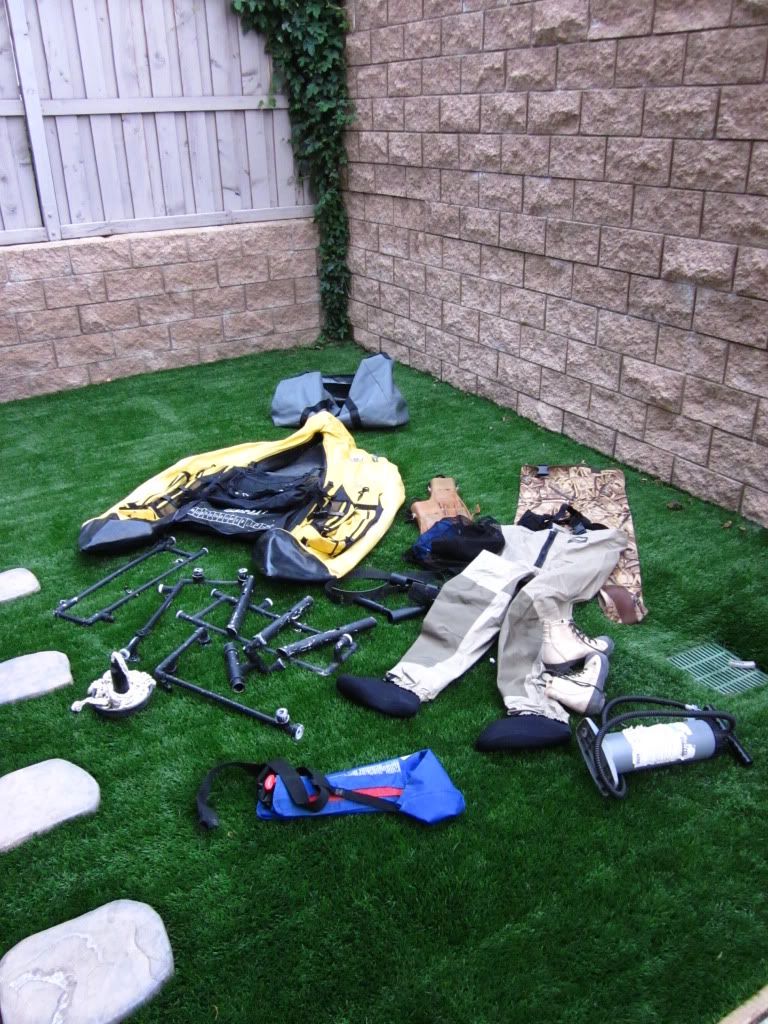
AFTER!!
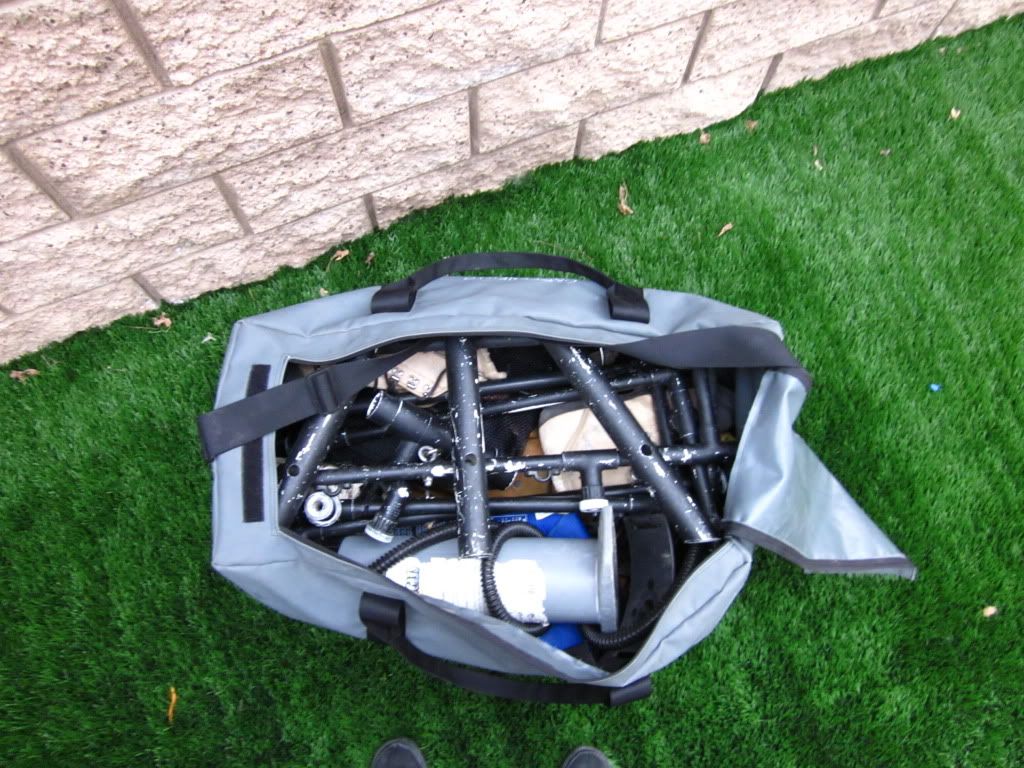
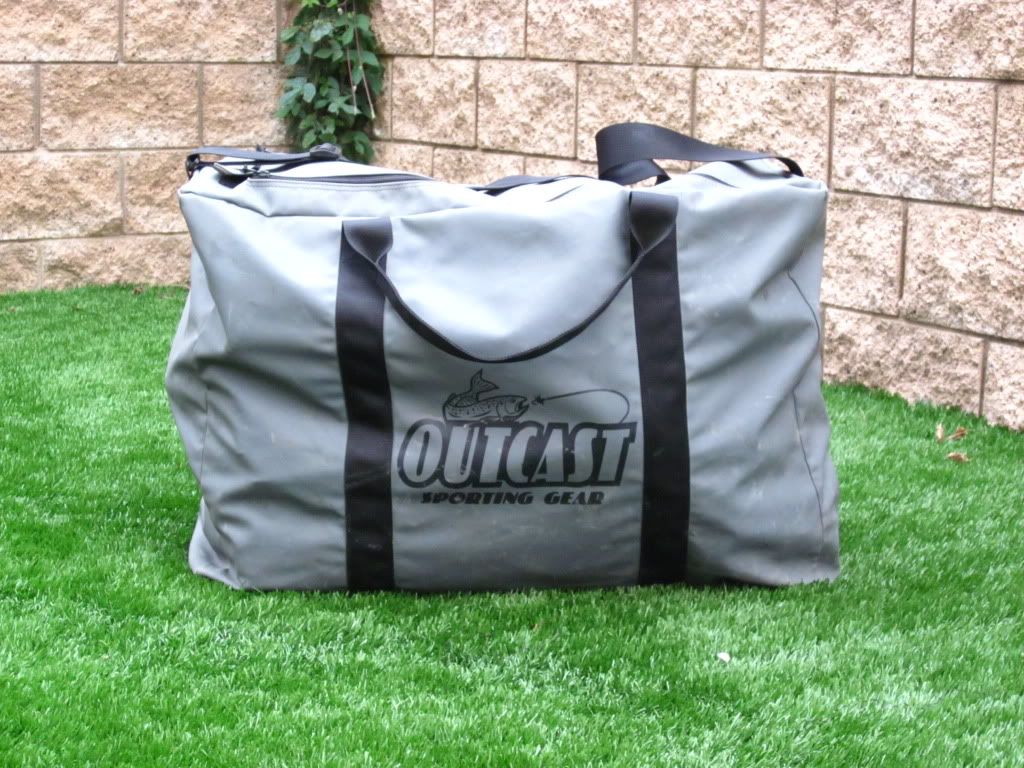
I’ve received a ton of FANTASTIC emails asking a variety of questions, many of which expressed a curiosity in my extravagant rig! I hope that I’ve answered your questions but if not, feel free to ask anything and everything and I’ll do my best to give you my 2 cents. I truly can’t wait to see the creative things that you guys come up with using this system!!! If you do end up putting this together, I’d really love to see pics!!!!
As always, thanks a bundle for taking a read guys and looking forward to seeing you all out on the water!!! IT’S TIME TO GO FISHING!!!!!!! WOOOOOHOOOOOOOO!!!!!!!!!!!!!!!!!!!!!
Update: With the thread already reaching epic proportions I thought that the pics on the tube would suffice. But of course I should have taken some stand alone pics of the rig! Here are a few cell phone pics with my dog for scale…She’s quite the ham in front of the camera!!
